
A curved cinder block wall offers both aesthetic appeal and functional benefits for managing slopes, creating garden terraces, and defining outdoor spaces. Building a curved wall requires more precision than a straight wall, but the results create natural flow in your landscape while providing superior structural strength through the arch principle.
This guide walks you through each stage of construction, from planning your curve and selecting the right blocks to digging a proper foundation and laying the first course level. We’ll cover how to stagger joints for stability, install essential drainage, and add capstones for a finished look. Whether you’re a property manager or a homeowner tackling a DIY hardscaping project, you’ll learn the techniques for long-lasting results.
I’m Scott McLeod, owner of McLeod Landscaping. For over 30 years, my team has designed and built countless curved cinder block walls for residential and commercial properties throughout the Merrimack Valley. This guide shares our proven methods for creating durable, beautiful walls that stand the test of time.
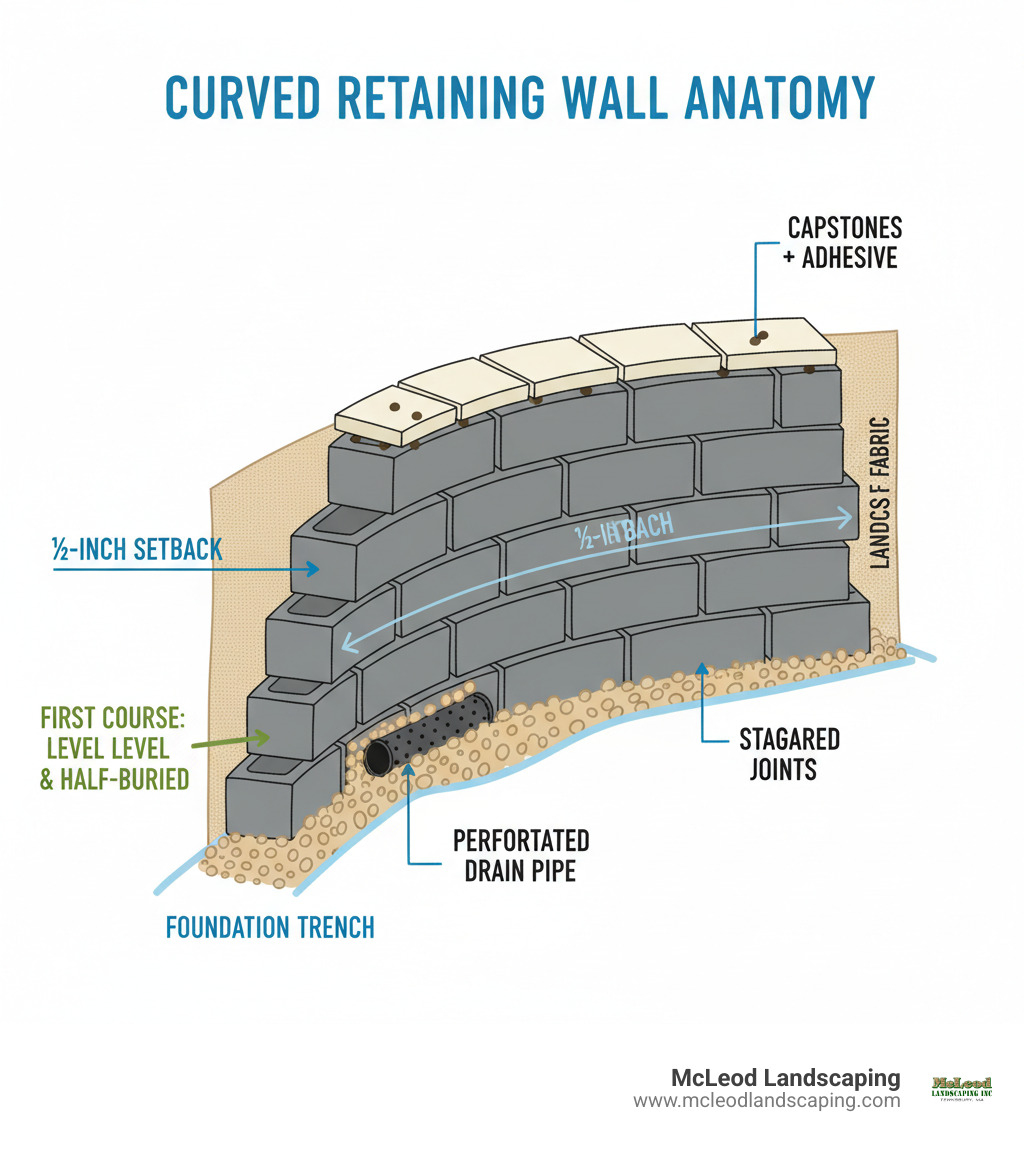
Proper planning is the blueprint for a successful curved cinder block wall, ensuring both structural integrity and beauty. A solid plan saves you from costly mistakes. For comprehensive guidance, see our insights on Retaining Wall Design.
Curved walls aren’t just prettier—they’re stronger. The arch principle distributes soil pressure along the entire curve, making it naturally resistant to the bulging or cracking that can affect flat walls. Beyond engineering, a curved wall brings natural flow to your landscape, softening hard edges and creating visual interest. They excel at defining intimate garden beds, patios, and seating areas, changing a boring slope into a dramatic feature. For more creative applications, explore our Landscape Retaining Wall Ideas.
To lay out your curve, use one of these methods for a professional look:
Before digging, check local building codes. Most areas allow DIY walls up to three or four feet without permits, but taller walls often require engineering plans. Also, you must call 811 a few days before you dig. This free service marks underground utility lines to prevent dangerous and expensive accidents.
The right blocks make the project smoother. While standard rectangular blocks are budget-friendly, they create small gaps on the outside of the curve and may require more cutting. Trapezoidal or angled-end blocks are designed for curves, fitting together snugly to minimize gaps and simplify placement, especially on tighter radiuses.
You’ll also choose between hollow core and solid blocks. Hollow blocks are lighter, but for taller walls, their cores should be filled with gravel or concrete (often with rebar) for strength. Solid blocks are heavier but offer greater mass and durability from the start. For more details on block types, see our guide on Concrete Block Retaining Wall.
Having the right tools and materials is key to an efficient project. Before you begin, prioritize safety: always wear safety glasses, work gloves, and a respirator when cutting blocks. A back support belt is also recommended for heavy lifting.

Gather these tools before you start:
Buy about 10% more blocks than you estimate to account for cuts and breakage. You can usually return unused materials.
With your tools and materials ready, you can break ground on your curved cinder block wall.
With your plan and materials ready, it’s time to build. The stability of your curved cinder block wall depends on getting the foundation and first courses right. For a general overview, refer to our guide on Building a Retaining Wall.
A solid, level foundation is non-negotiable.
For sloped terrain, you’ll need to step the base course. Find detailed instructions in our guide on how to build a retaining wall on a slope.
The first course is the backbone of your wall.
To build a strong wall, you must stagger the joints in a running bond pattern, where each block bridges the joint of the two blocks below it. This usually requires starting the second course with a half-block.
You’ll need to cut blocks to maintain the pattern. A hammer and cold chisel work, but a masonry saw is faster and more precise. Always wear safety gear when cutting. Apply a generous bead of construction adhesive or a consistent bed of mortar before setting each new block. For stability, set each course back about ½ inch into the slope. This slight backward lean, or “batter,” helps the wall resist soil pressure. After laying each block, use your level to check that the course is horizontal and the wall face is plumb.
For a helpful visual, explore this guide on masonry techniques.
Drainage is critical to prevent hydrostatic pressure—the force of water-saturated soil—from damaging your wall. This is the number one reason retaining walls fail.
Proper drainage protects your investment. For more details, see our guide on Retaining Wall Drainage.
You’re nearing the home stretch! With the main structure of your curved cinder block wall complete, it’s time to focus on the finishing touches that transform it from a functional structure into a beautiful landscape feature. This is where your hard work truly pays off, as these final steps dramatically improve both appearance and long-term durability. We’ll also walk through realistic budget expectations and help you sidestep the common mistakes that can undermine an otherwise solid project.

Cinder blocks are functional, but you can easily improve their look:
For more ideas, check out these examples of exposed cinder block walls.
Avoid these common pitfalls to ensure your wall lasts:
Building a curved cinder block wall is an investment. Costs include materials (blocks, gravel, adhesive) and professional labor, if you choose to hire a team.
Several factors influence the total price: wall height and length, the tightness of the curve (which can require more cuts), site access, and your choice of finishing materials like stone veneer.
Important disclaimer: The following cost ranges represent average pricing based on internet research and industry data, not actual quotes from McLeod Landscaping. Your specific project costs will vary based on your location, material prices, and project complexity.
Retaining wall costs typically range from $30 to over $300 per square foot of wall face, showing a wide variance. The high end for complex, professionally installed walls can easily be more than three times the cost of simpler projects. A curved cinder block wall often falls in the mid to higher end of this range due to its complexity. For a detailed breakdown, refer to our guide on how much a retaining wall costs.
A well-built wall is an investment. For complex projects, professional expertise ensures safety and longevity. Our team at McLeod Landscaping offers professional retaining wall installation for projects where structural integrity is paramount.
Here are clear, helpful answers to the most common questions about building a curved cinder block wall.
For most DIY projects, it’s best to keep the wall height under 3 to 4 feet. Any retaining wall taller than this often requires a building permit and plans from a structural engineer, as the pressure from the soil increases dramatically with height. Regulations vary by municipality, so always check with your local building department before starting.
It depends on the wall’s height and purpose. For short, decorative walls under 3 feet, filling the cores may not be necessary. However, for taller walls, walls retaining significant weight, or in regions with freeze-thaw cycles, filling the cores is highly recommended. You can fill them with gravel for added weight or with concrete and rebar for maximum structural strength. This prevents frost heave and turns the individual blocks into a solid, monolithic structure.
The main differences are in the installation method and skill required.
You’ve made it through the entire journey of building a curved cinder block wall! This is a project that truly transforms a landscape, combining the visual beauty of a flowing curve with the practical benefits of slope management, erosion control, and defined outdoor spaces. The arch principle working in your favor means you’re not just building something attractive—you’re creating a structure that’s inherently stronger than a straight wall.
Throughout this guide, we’ve covered the essential steps: planning your curve with the stick-and-string method, choosing the right blocks for easier positioning, excavating a proper foundation, laying that critical first course perfectly level, building up with staggered joints, and installing the drainage system that will keep your wall standing strong for decades. Each of these steps matters. Skip the drainage, and you’re inviting hydrostatic pressure to slowly push your wall over. Rush through leveling, and you’ll see those errors magnified with every course you add.
We’ve also explored the finishing touches that take your wall from functional to beautiful—whether that’s securing handsome capstones, applying a coat of paint, or adding landscape lighting to highlight the curve at night. And we’ve been honest about the costs, which can range widely from $30 to over $300 per square foot. It’s important to remember that these are internet averages, not quotes from us, and complex projects can easily cost several times more than simple ones. Every project has its own unique factors.
The truth is, while many homeowners successfully tackle curved cinder block walls as DIY projects, there’s no shame in recognizing when a project calls for professional expertise. Walls taller than 4 feet, sites with challenging soil conditions, steep slopes, or intricate designs that require structural engineering—these situations benefit enormously from experienced hands. After 30 years in the business, I’ve seen what happens when ambition exceeds skill level, and I’ve also seen the pride homeowners feel when they know their wall was built right the first time.
At McLeod Landscaping, we’ve designed and built countless retaining walls throughout the Merrimack Valley, and we bring that depth of experience to every project. Whether you’re a property manager in Lowell looking to improve commercial landscaping, or a homeowner in Chelmsford, Westford, or Wilmington dreaming of terraced garden beds, we’re here to help you create something that lasts.
If you’re ready to move forward with your curved cinder block wall project—or if you’d simply like to discuss whether DIY or professional installation makes the most sense for your specific situation—we’d love to hear from you.
Contact us for a professional retaining wall installation and let’s build something beautiful together.
Contact McLeod Landscaping today at (978) 640-0957 or click here to schedule a consultation for retaining wall installation. Let our experienced team design and install a functional and visually appealing retaining wall that enhances your landscape.


1881 Main St Unit 1, Tewksbury, MA 01876