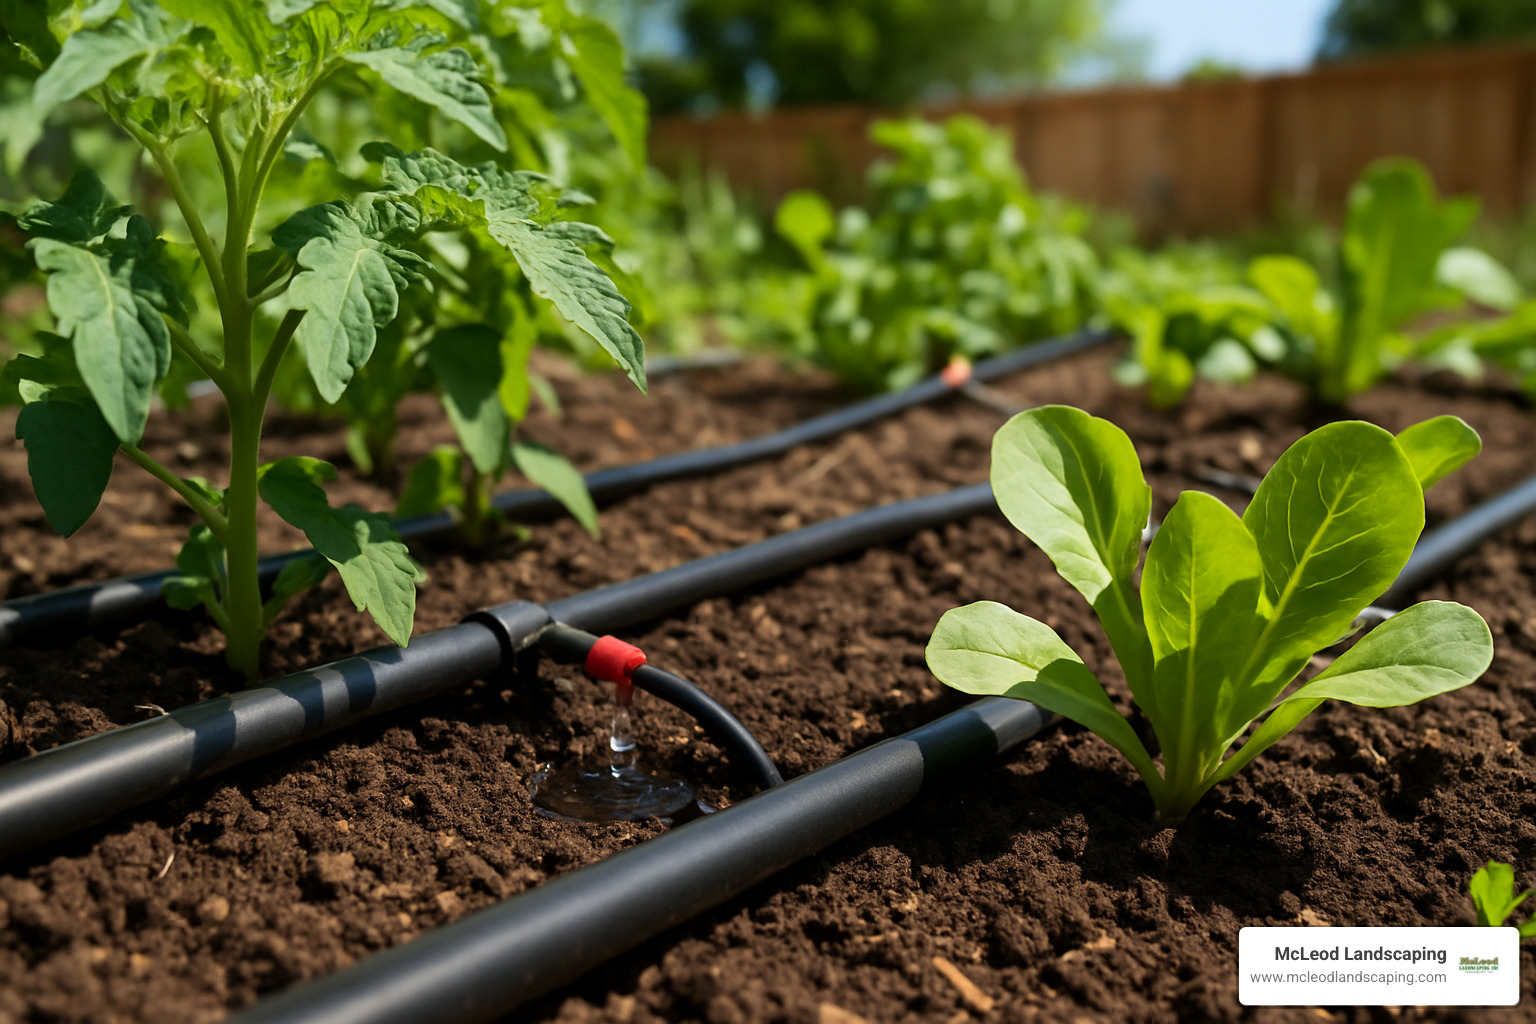
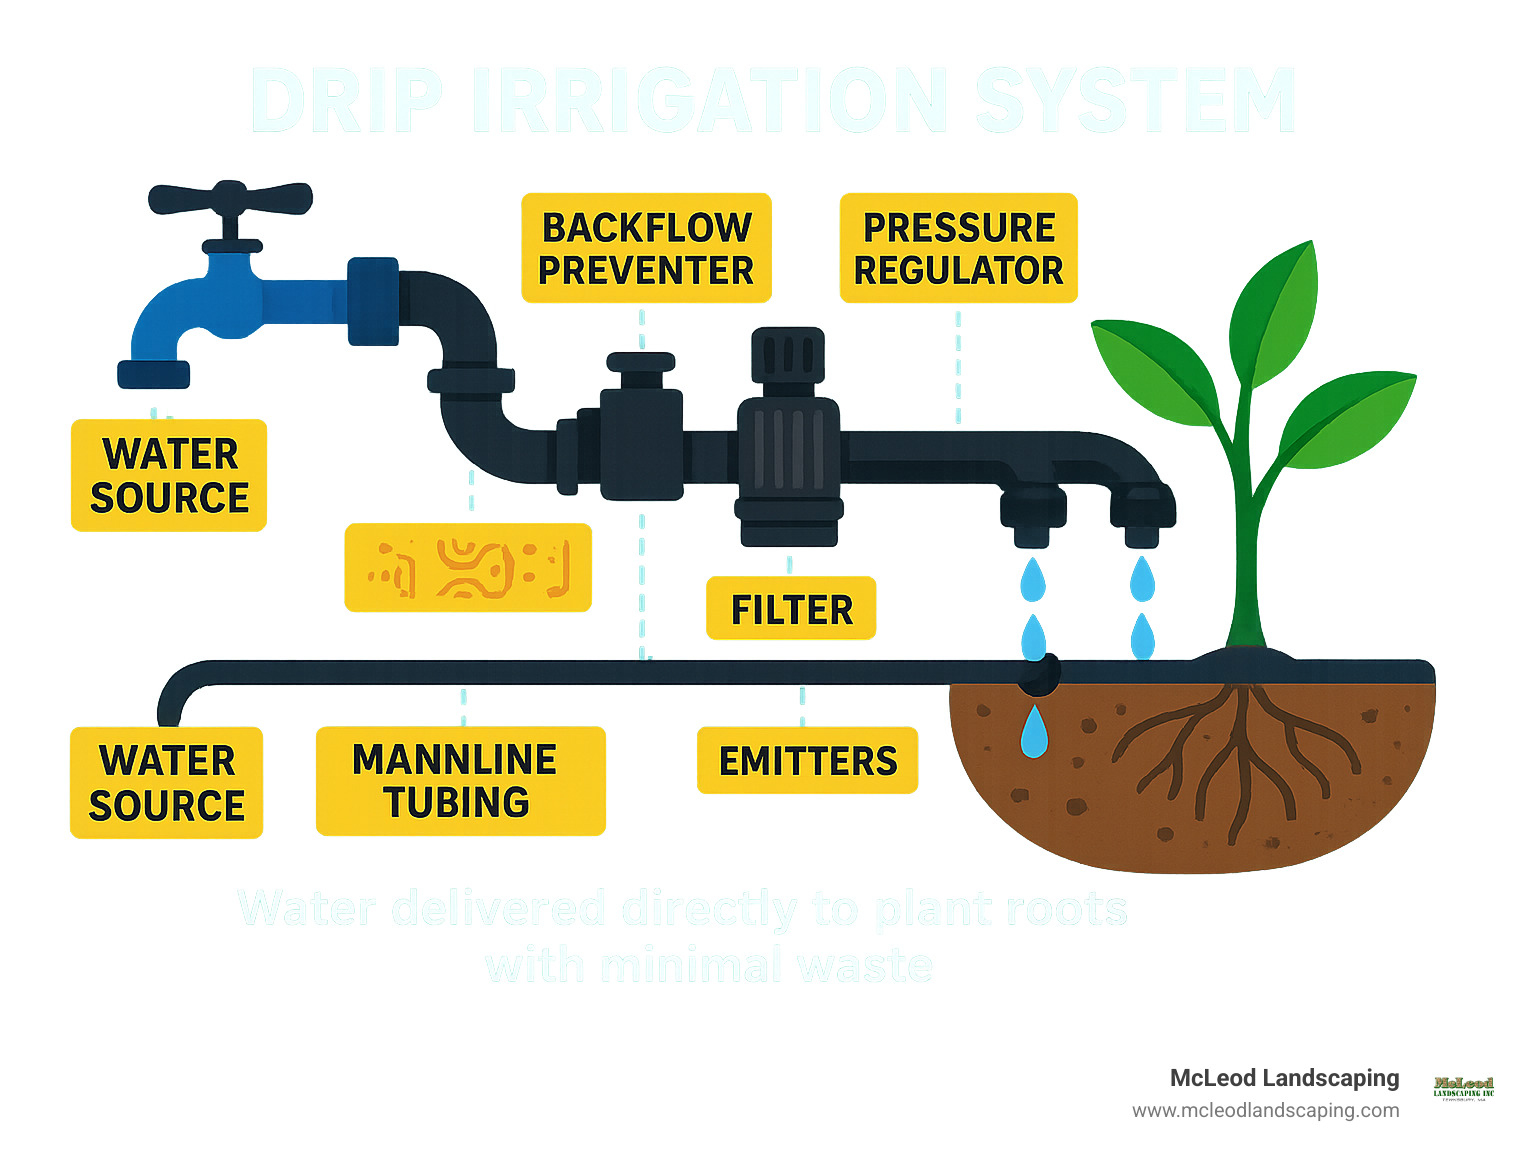
Drip irrigation systems are specialized watering setups that deliver water directly to plant root zones through a network of tubing and emitters. These systems provide precise moisture control while minimizing waste.
| What Are Drip Irrigation Systems? | Key Benefits |
|---|---|
| • Low-pressure water delivery systems (20-50 psi) | • Reduces water usage by up to 60% |
| • Applies water slowly at 2-20 liters/hour | • Achieves 90% efficiency (vs. 50-70% for sprinklers) |
| • Delivers moisture directly to plant roots | • Minimizes evaporation and runoff |
| • Can be automated with timers and sensors | • Promotes healthier plant growth |
| • Available in multiple formats (soaker hose, emitter, drip tape) | • Reduces weed growth between plants |
Drip irrigation works by slowly releasing water at the soil level, where plants need it most. Unlike traditional sprinklers that spray water into the air (where much is lost to evaporation), drip systems provide consistent moisture directly to root zones. This targeted approach not only conserves water but also improves plant health by keeping foliage dry, which helps prevent fungal diseases.
The most efficient watering method available to home gardeners, drip irrigation systems can be custom to water everything from vegetable rows to ornamental landscapes. Installation requires minimal tools, and many systems are designed for DIY setup with simple connectors that don’t require glue or special skills.
My name is Scott McLeod, and as the owner of McLeod Landscaping, I’ve designed and installed drip irrigation systems for hundreds of commercial and residential properties throughout the Merrimack Valley area over the past 30 years, helping clients reduce water consumption while maintaining beautiful, thriving landscapes.
Drip irrigation systems word list:
– Automatic Underground Lawn Sprinklers
– how does a lawn irrigation system work
– types of lawn irrigation systems
Looking for a simple introduction to drip irrigation systems? Soaker hoses might be your perfect match. These clever garden tools are essentially porous rubber hoses (often made from recycled tires) that gently “sweat” water along their entire length, creating a moisture zone perfect for beds and borders.
“I always tell new gardeners that soaker hoses are like training wheels for water-efficient gardening,” says our irrigation team leader at McLeod Landscaping. “They deliver impressive results without requiring an engineering degree to set up.”
These workhorse hoses perform best in straight runs under 100 feet, with water pressure kept between 8-15 psi using simple regulators. Without these regulators, you might find your hose bulging, leaking excessively, or even bursting at higher pressures.
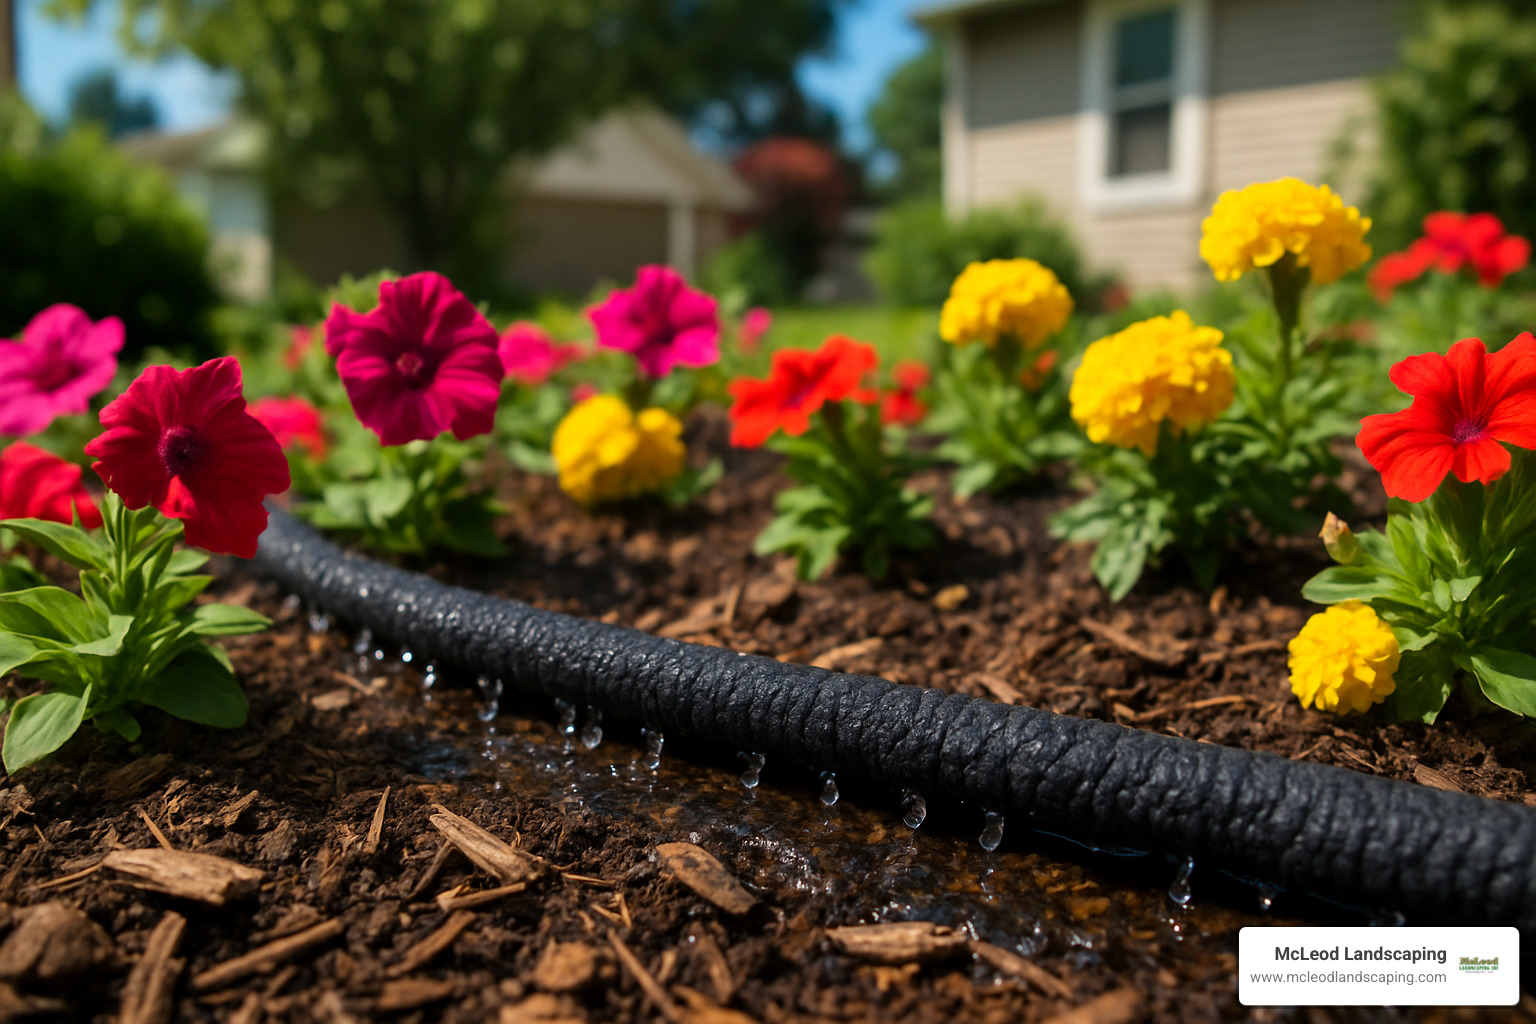
The water savings are nothing to sneeze at – most of our clients report using 30-50% less water compared to traditional sprinklers. Since water seeps directly into the soil rather than spraying into the air, very little is lost to evaporation or runoff. This targeted watering brings another delightful bonus: fewer weeds between your plants! Quality soaker hoses are also UV-resistant, standing up to our harsh New England sunshine season after season.
For best results (and a tidier garden), we recommend tucking your soaker hose under 2-3 inches of mulch. This not only hides the hose but further reduces evaporation and protects the rubber from sun damage.
More info about water conservation
Soaker hoses truly shine in specific garden scenarios:
Shallow-rooted plants love the consistent moisture these hoses provide – think lettuce, annual flowers, and most vegetables. Flower beds and borders with their curving edges are perfect matches for the flexible nature of soaker hoses. If you’re a beginning DIYer intimidated by more complex irrigation, soaker hoses offer a gentle learning curve with instant gratification. Just remember that they work best on level sites – significant slopes can lead to uneven watering as gravity pulls water downhill.
One of our Chelmsford clients recently shared, “I finally took the plunge with soaker hoses last spring after years of hand-watering my cutting garden. My dahlias have never looked better, and I’m kicking myself for not doing this years ago. Plus, my water bill actually went down despite the heat waves we had!”
When shopping for a soaker hose kit, keep an eye out for these quality features:
Double-wall construction provides more durability and even water distribution than single-wall alternatives. Quick-coupling connectors make seasonal adjustments a breeze – no tools required! For proper coverage, position your hoses 12-20 inches apart (closer spacing for sandy soil, wider for clay soils). Always cover with 2-3 inches of mulch to maximize efficiency and extend hose life. Look for freeze-proof materials that can withstand our unpredictable New England winters if you plan to leave the system in place year-round.
Many of our Tewksbury customers leave their soaker hoses in the garden through winter, simply disconnecting from the water source and draining any remaining water before the first freeze hits.
Soaker hose kits represent the budget-friendly entry point into the drip irrigation systems world. A typical kit covering 50-100 feet of garden space ranges from $25 for basic models to $120 for premium packages with timers and pressure regulators.
The return on investment is surprisingly quick. Most systems save between 6,000-12,000 gallons of water per growing season for an average garden. Our residential clients typically recoup their investment within 1-2 summers through water bill savings alone – not to mention the time saved on manual watering and the improved plant health.
As one Burlington client told us with a laugh, “My soaker hose system was the best garden investment I’ve made in twenty years – except maybe my favorite pruning shears. My water bill dropped by almost 40%, and I’m no longer a slave to hand-watering during July heatwaves. Best of all, no more accidentally spraying myself while trying to reach the back of the border!”
*Average costs based on national online data; actual pricing varies widely by region and project scope.
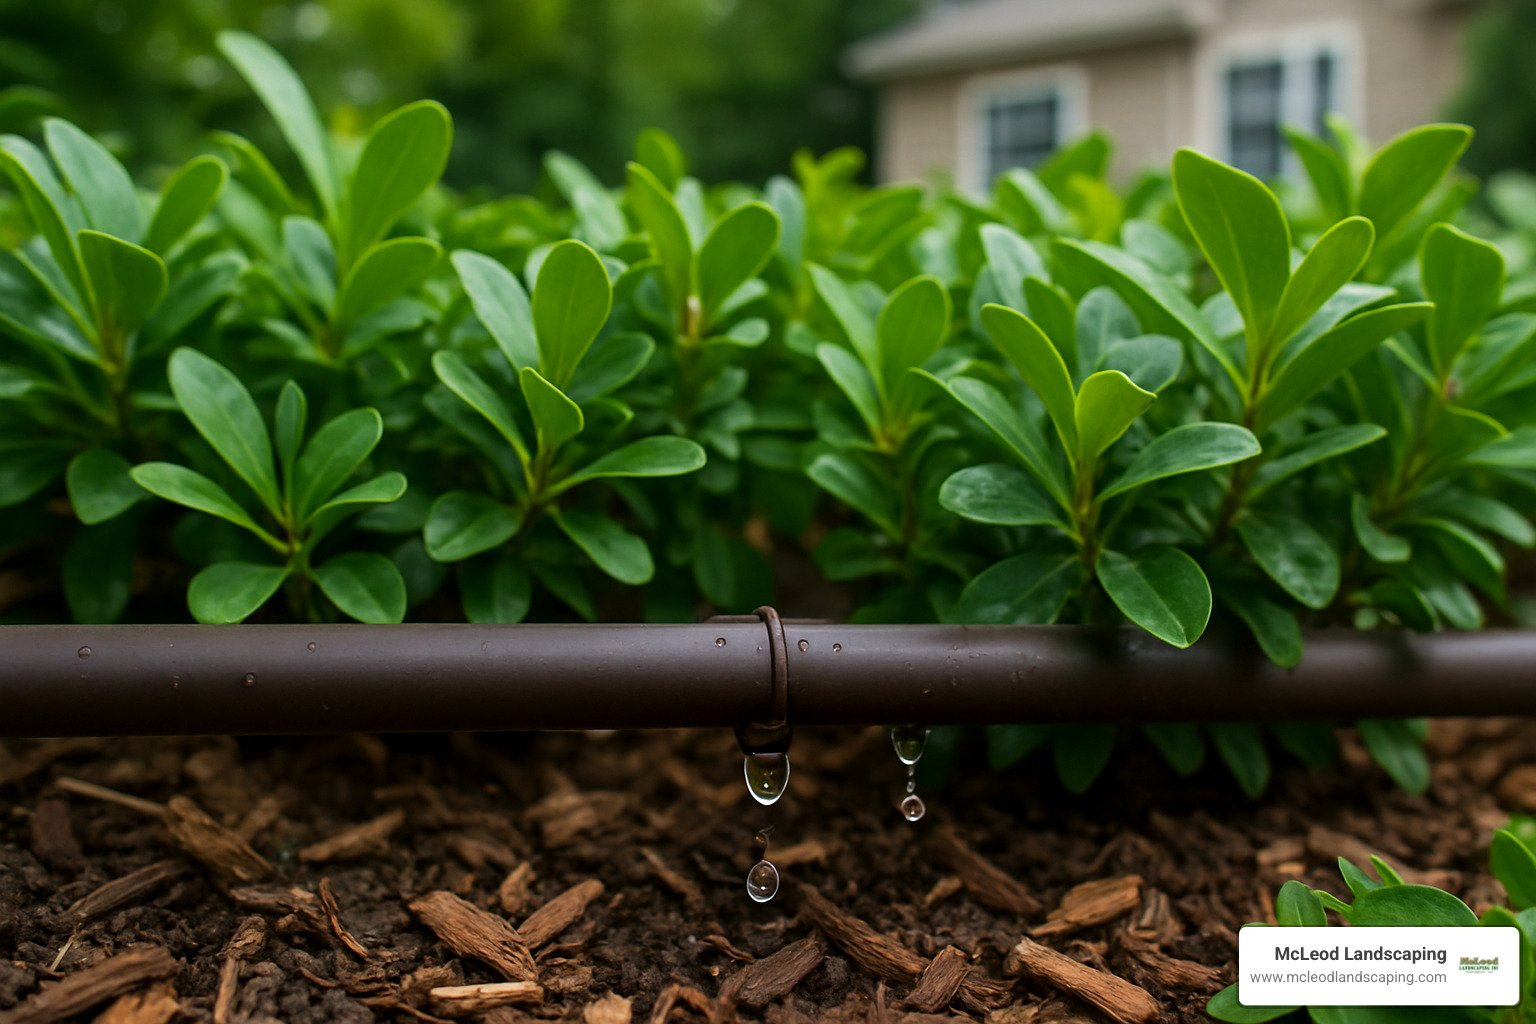
For gardeners ready to step up their watering game, inline emitter tubing systems represent the gold standard of drip irrigation systems. Unlike soaker hoses, these systems feature pre-installed emitters built directly into the tubing at regular intervals—typically spaced 12-18 inches apart—delivering water with surgical precision.
“Inline emitter systems are the workhorses of modern drip irrigation,” explains our lead irrigation technician at McLeod Landscaping. “They offer the perfect balance of customization and convenience. The built-in emitters eliminate the need to punch holes and install individual drippers, which saves considerable setup time.”
These systems deliver water at specific points rather than along the entire length of the tube, making them perfect for mixed plantings where water needs vary. Most emit between 0.5-2 gallons per hour (gph), allowing you to match flow rates to your plants’ specific needs. Many premium models feature pressure-compensating emitters that maintain consistent flow regardless of elevation changes—a huge advantage for the rolling landscapes common throughout Concord and Carlisle.
Don’t skip on filtration! We strongly recommend installing a 100-mesh filter upstream of your system to prevent clogging. This is especially important with municipal water sources that might contain sediment or minerals that could block those tiny emitter openings.
One of the biggest advantages of these systems is their automation-readiness. They easily connect to timers and moisture sensors for hands-free operation. Many also include ports for fertilizer injection (fertigation), letting you deliver nutrients directly to plant roots while watering—talk about efficiency!
Inline emitter systems truly shine when used with woody plants and mixed landscapes. They’re especially well-suited for shrubs and ornamental plantings where the precise spacing and controlled flow rates help establish healthy root systems. Young trees benefit tremendously from the consistent moisture delivered exactly where developing roots need it.
These systems also work beautifully for foundation plantings, allowing you to steer around building perimeters while providing even coverage. For container gardeners, they’re a game-changer—multiple pots can be watered simultaneously with appropriate emitter placement.
A client in Lowell recently told us: “After McLeod installed an inline emitter system for my mixed border of hydrangeas and perennials, I noticed immediate improvement. Each plant gets exactly the water it needs, and I’m no longer wasting water on walkways or between plants. The system has been running flawlessly for three seasons now.”
Quality inline emitter systems include several important features that improve durability and performance. Look for PVC or polyethylene mainline materials that resist UV damage and provide years of reliable service. Perma-loc fittings allow for system modifications without replacing components—perfect for when your garden evolves.
Isolation valves are worth their weight in gold, enabling sectional control for varying water needs in different garden areas. Don’t overlook the importance of clip stakes placed every 3 feet to secure tubing and prevent movement, especially important after heavy rains when soil shifts.
We always include end flush valves in our installations, allowing for periodic system cleaning to prevent clogging. This simple maintenance feature extends system life considerably.
During installation, we typically recommend burying the mainline pipes shallowly (about 4 inches deep) to protect them from UV degradation and lawn equipment. However, we always test the layout before burial to ensure proper coverage and function.
Inline emitter systems represent a mid-range investment in garden irrigation. Typical kits covering 500-1,000 square feet range from $75 for basic setups to $350 for comprehensive systems with automation components. These average costs are based on national online data, and actual pricing varies widely by region and project scope.
Installation is remarkably straightforward, with most residential systems requiring just 2-3 hours for a DIY approach. Our professional installation service can complete most residential systems in a single day, ensuring optimal placement and function.
The water savings are substantial, with most clients reporting 30-60% reduction in water usage compared to traditional methods. This efficiency translates to both environmental benefits and significant cost savings over time.
A commercial client in Westford shared their experience: “After installing inline emitter irrigation throughout our office park’s landscaping, we’ve reduced our summer water consumption by nearly 45%. The system paid for itself within two seasons, and our maintenance team spends far less time hand-watering during dry spells.”
If you’re growing vegetables, maintaining raised beds, or running a market garden, drip tape might just revolutionize your watering routine. Unlike other drip irrigation systems, this specialized ultra-thin tubing features precisely placed emitter slits every 6-8 inches, creating a perfect water delivery system for straight planting rows.
“Drip tape is the commercial grower’s secret weapon,” explains our agricultural irrigation specialist. “It’s lightweight, incredibly efficient, and perfect for seasonal crops that follow straight planting lines.”
What makes drip tape special is its consistent, gentle flow rate—typically between 0.23-0.42 gallons per hour per emitter. This slow, steady moisture penetrates deeply to reach crop roots exactly where needed. Available in generous roll lengths from 500-1,500 feet, you can easily accommodate anything from a couple of backyard raised beds to a sprawling market farm operation.
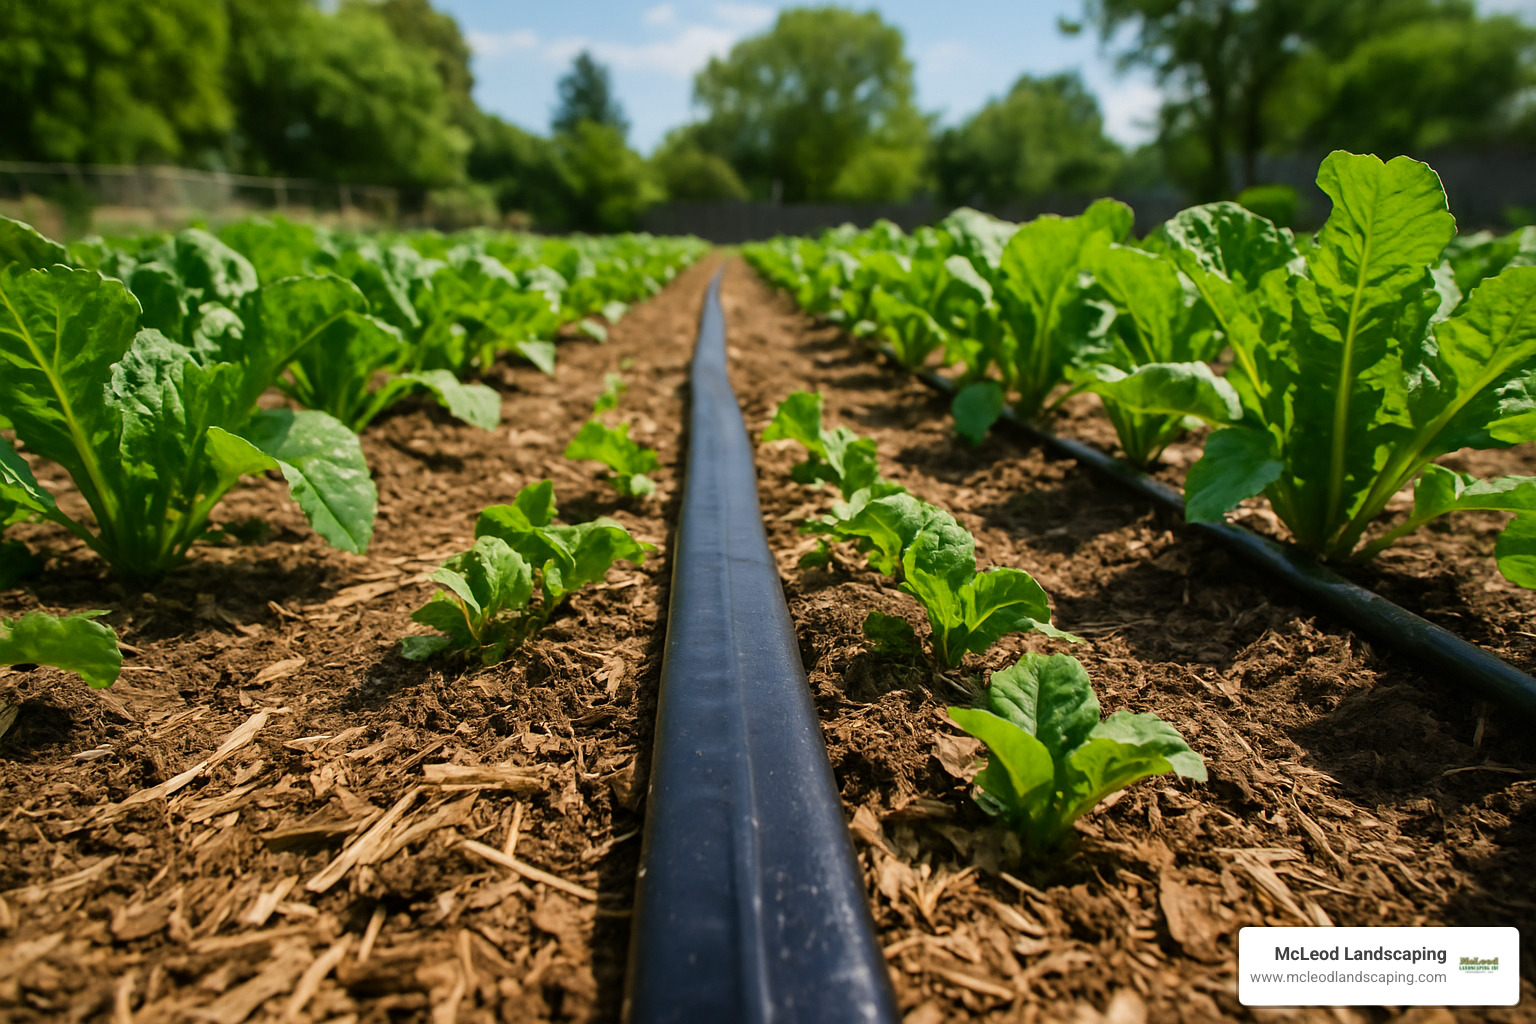
For best results, we typically install drip tape about 1-2 inches below the soil surface or under a layer of mulch, with the emitter holes facing upward. This strategic placement serves multiple purposes—it shields the tape from damaging UV rays, significantly reduces evaporation, and keeps your garden looking tidy by hiding the irrigation system from view.
The benefits extend far beyond aesthetics. Research from MIT has shown that drip tape systems can boost crop yields by up to 90% while dramatically reducing water consumption compared to overhead watering methods. This remarkable efficiency comes from delivering moisture directly to root zones, which not only nurtures your plants but also reduces disease pressure and limits weed competition.
Scientific research on drip tape efficiency
Drip tape truly shines in several specific gardening scenarios. Vegetable rows benefit from the straight-line design that perfectly follows traditional planting patterns. Raised beds get complete coverage in their defined growing spaces without wasted water. Hoop houses and greenhouses stay drier overall since the system delivers precise moisture without wetting foliage. Market gardens can scale efficiently for commercial production with minimal waste.
A client in Wilmington who manages a community garden shared her experience: “We switched all twenty of our raised beds to drip tape last season. The difference was remarkable—our tomato and cucumber yields nearly doubled, and we cut our water usage by more than half. Plus, the reduced humidity from avoiding overhead watering meant less powdery mildew on our squash plants.”
A well-designed drip tape system includes several critical components that ensure optimal performance. The header line with individual valves gives you control over separate rows or beds, allowing customized watering schedules for different crops. A pressure reducer set between 10-15 psi prevents tape rupture—an absolute necessity for these thin-walled systems.
Don’t overlook the importance of flush end caps, which enable periodic cleaning to prevent clogging from mineral buildup or soil particles. If portions of your tape will be exposed to sunlight, look for UV-resistant materials to extend system life. Quality drip tape can be reused for 2-3 growing seasons with proper care, especially if you invest in reusable fittings that simplify seasonal setup and takedown.
For our New England clients, we typically recommend removing and storing drip tape at the end of each growing season. This simple precaution significantly extends the tape’s lifespan and prevents winter damage, particularly important for raised beds that freeze deeply during our harsh winters.

Drip tape delivers exceptional value, particularly for vegetable production. The tape itself typically costs between $0.02-$0.05 per foot, with complete kits ranging from $150 for a small garden to $600 for market-scale production. These figures represent average costs based on national online data, with actual pricing varying widely by region and project scope.
The return on investment becomes particularly compelling when you consider food production benefits. With yield increases of up to 90% reported in some crops, many gardeners recoup their investment through increased harvest value in a single season.
A client in Carlisle who grows heirloom tomatoes couldn’t contain her enthusiasm: “After installing drip tape in my raised beds, I harvested nearly twice as many tomatoes as the previous year, using about a third of the water. The consistent moisture also eliminated blossom end rot, which had been a persistent problem. I’ll never go back to overhead watering.”
Have you ever wanted a watering solution that gives you complete control without breaking the bank? For gardeners who love to tinker or have specialized watering needs, micro-misting systems and PVC-based drip irrigation systems offer creative solutions that combine water efficiency with endless customization possibilities.
Micro-misters use small 360° sprayers that produce a gentle fog-like mist that’s perfect for delicate applications. Unlike traditional sprinklers that blast water everywhere, these low-volume emitters operate at reduced pressure, creating minimal wind drift while providing gentle, even coverage.
“Micro-misters are like the perfect middle child between drip irrigation and traditional sprinklers,” says our irrigation designer at McLeod Landscaping. “They’re absolutely perfect for seedbeds where you don’t want to wash away tiny seeds, or for creating that humid microclimate that ferns and tropical plants crave.”
Many of our clients have finded an unexpected bonus with micro-misters—natural frost protection. Running these systems during early morning freezes can create a protective barrier around tender buds and blossoms, maintaining temperatures just above freezing when those late spring cold snaps threaten.
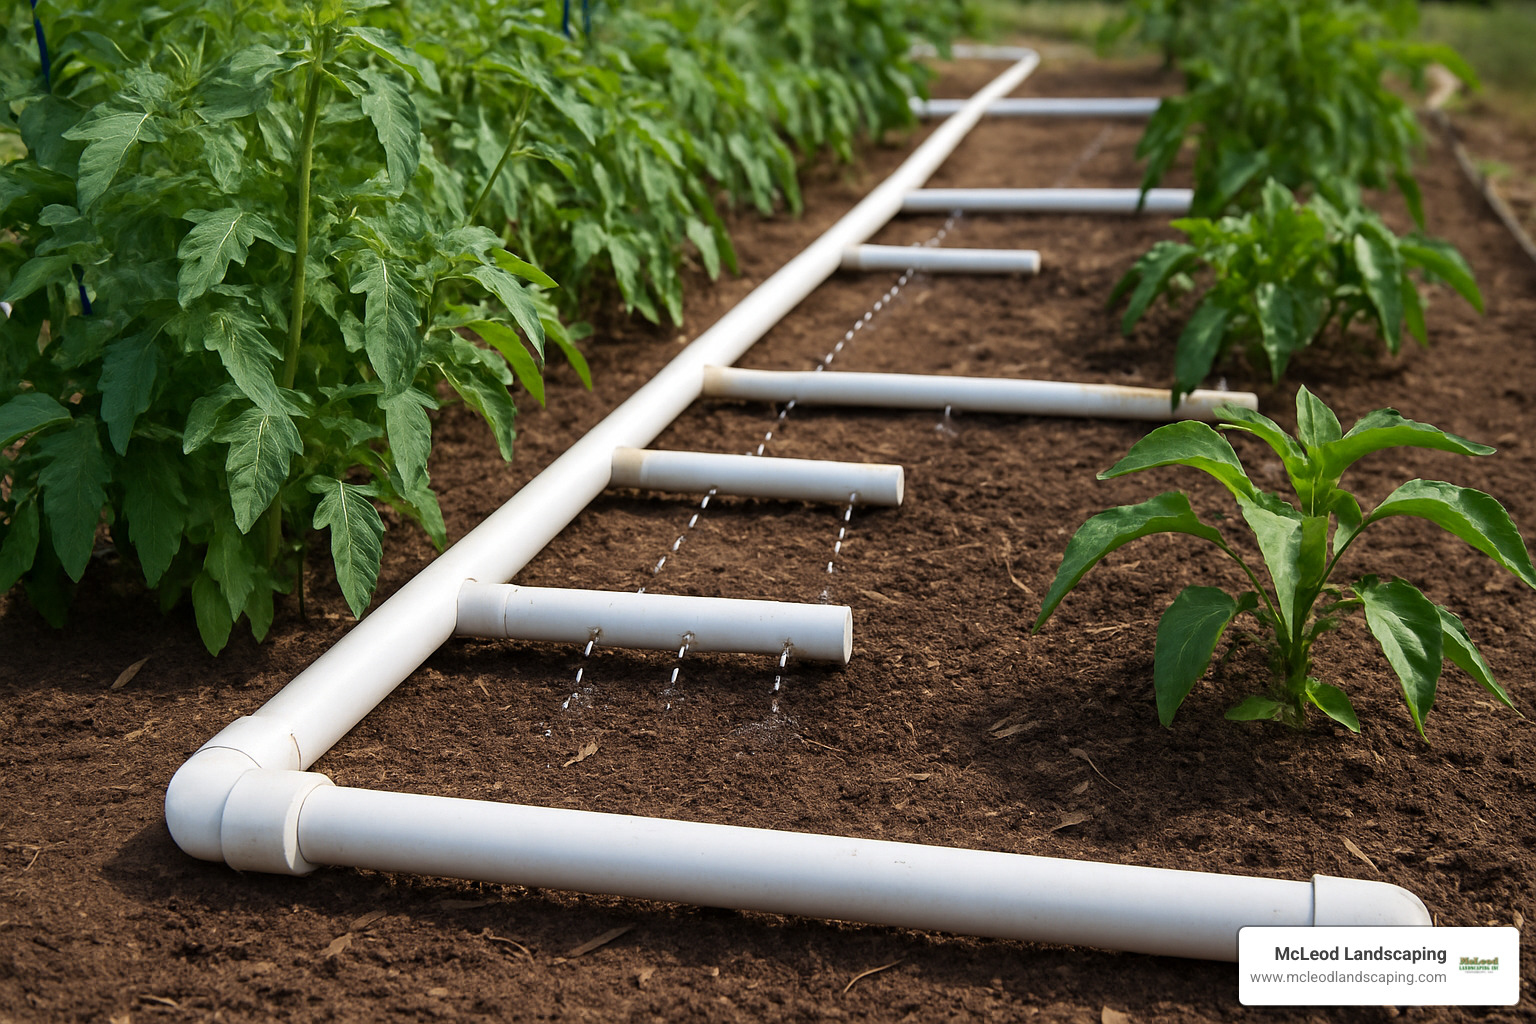
For the truly budget-conscious gardener with a DIY spirit, PVC drip systems offer remarkable value and satisfaction. These clever systems use standard PVC pipe with small (typically 1/16″) holes drilled at regular intervals. The pipe is positioned with holes facing downward, delivering water directly where plants need it most.
One enthusiastic client from Andover couldn’t contain his excitement: “I felt like a kid with an erector set! I spent about $75 on materials, spent a Saturday afternoon drilling holes every 6 inches, and now my entire vegetable garden practically waters itself. My wife says it’s the first time my ‘tinkering’ actually saved us money!”
The beauty of PVC systems lies in their adjustability—by varying hole size and water pressure, flow rates can be fine-tuned from a mere drip to 10 gallons per hour per hole. Even better, since PVC fittings can be assembled without glue (using slip connections), you can reconfigure your system as garden needs change or plants grow.
Curious to see how it works? Here’s our how-to video that walks you through the entire process.
These innovative watering solutions shine brightest in specific garden situations:
Orchards and fruit trees benefit tremendously from micro-misters, which provide gentle, widespread coverage for establishing root systems without wasting water between widely spaced trees.
Seedbeds and propagation areas thrive under the gentle touch of micro-mist, which won’t displace tiny seeds or damage delicate seedlings the way heavier water drops might.
Large individual plants with substantial water needs, like massive squash or pumpkin plants, get precisely what they need from strategically placed PVC drip lines.
Budget DIYers absolutely love PVC systems, which offer maximum customization at minimal cost—perfect for gardeners who enjoy problem-solving and working with their hands.
A Billerica homeowner shared her experience: “I installed a PVC drip system throughout my dahlia collection last spring. The materials cost less than $100, and I’ve been able to adjust and expand it as my collection grows. My blooms have never been more prolific, and I’m using a fraction of the water compared to my old sprinkler setup.”
What makes these systems special? Several unique features set them apart:
¾” PVC for longer runs provides adequate water flow for rows extending 25+ feet without losing pressure at the far end—essential for larger gardens.
Un-glued slip fittings allow for seasonal reconfiguration without buying new materials. Simply twist apart, rearrange, and reassemble as your garden evolves.
Ball valves for zone control enable customized watering for different plant needs—give your thirsty tomatoes more while reducing flow to drought-tolerant herbs.
Smart controller compatibility means many DIY systems can be automated with electronic timers, giving you vacation freedom without sacrificing plant health.
Simple tools required—just basic drills and saws are all that’s needed for construction, making this accessible to even novice DIYers.
For micro-misting systems, we typically recommend installing them on risers to achieve optimal coverage. This elevation helps prevent blockage by growing foliage and ensures even distribution of the fine mist throughout the season.
DIY PVC and micro-misting systems represent the most customizable irrigation options with highly variable costs. Materials typically range from $50 for a small herb garden system to $400 for extensive coverage with automation features.
The tools required are minimal—typically just a drill and saw for PVC systems—making them accessible to most homeowners. Installation time varies based on complexity, but most residential systems can be completed in a weekend of casual work.
Water savings compared to traditional sprinklers typically exceed 50%, with many users reporting reductions of 60-70% in water consumption. This efficiency translates to significant savings, particularly for larger landscapes.
A commercial client in Burlington who manages a community garden couldn’t believe the difference: “After switching from overhead sprinklers to a PVC drip system, our water usage dropped by nearly 65%. The installation cost was minimal, and our vegetable yields have increased substantially due to more consistent soil moisture. It’s been a win-win for our budget and our harvests.”
*Average costs based on national online data; actual pricing varies widely by region and project scope.
Drip irrigation systems deliver impressive water conservation that you’ll notice on both your water bill and in your garden’s health. Most of our clients are genuinely surprised by the difference – these systems typically reduce water consumption by 60% compared to traditional sprinklers.
The efficiency comes down to simple physics. When water drops directly onto soil at the root zone, you’re not losing precious moisture to wind drift or evaporation. Plus, the slow delivery rate (just 2-20 liters per hour) gives soil time to properly absorb moisture rather than creating runoff.
“I was skeptical about the 90% efficiency claims until I installed a drip system myself,” shares one of our Andover clients. “My plants are thriving with less water, and I’ve cut my summer watering time in half.”
This efficiency translates to real-world savings. A commercial property owner in Lowell told us: “Our quarterly water consumption dropped by 58% after converting our landscape beds from sprinklers to drip irrigation. The system paid for itself within 18 months through water savings alone.”
Your soil type plays a crucial role in determining the right emitter flow rate for your drip irrigation system. Using emitters matched to your soil conditions makes all the difference between efficient watering and wasted resources.
For New England gardens, we typically recommend:
Not sure about your soil type? Try this simple test before installing your entire system: run a single emitter for one hour, then dig down to see the moisture pattern. Ideally, you’ll find a bulb-shaped wet area extending both downward and to the sides.
“Many gardens in Tewksbury and surrounding towns have heavy clay content,” notes our soil specialist. “Using slower emitters with longer run times makes a huge difference in preventing water waste and ensuring deep root development.”
Our New England winters demand proper winterization of your drip irrigation system to prevent freeze damage. After helping hundreds of local homeowners protect their systems, we’ve developed this simple checklist:
First, disconnect and store all electronic components indoors – timers, controllers, and any battery-operated devices should come inside where it’s warm and dry. Next, open all end caps throughout your system to allow complete drainage.
For larger installations, consider using compressed air to blow out the main lines, especially if they’re buried. All filters should be removed, cleaned, and stored in your garage or basement for the winter.
Finally, disconnect everything from your water source, making sure backflow preventers and pressure regulators are completely drained.
“After my first drip system was damaged by freezing, McLeod taught me proper winterization,” a Westford client told us. “I’ve followed their five-step process for three years now, and my system starts up perfectly each spring with no repairs needed.”
For visual learners, we recommend watching our detailed Winterization video that walks through each step of the process.
Even soaker hoses that claim to be freeze-proof benefit from proper winterization. While the hose material might withstand freezing, connection points and fittings are particularly vulnerable to ice damage. A little prevention in November saves significant headaches (and expenses) in spring.
Drip irrigation systems offer a game-changing approach to garden watering that benefits both your plants and your wallet. By delivering moisture directly to plant roots with pinpoint accuracy, these systems create healthier landscapes while dramatically cutting water waste and reducing your environmental footprint.
The beauty of drip irrigation lies in its versatility. Whether you’re drawn to the simplicity and affordability of soaker hoses, the precision control of inline emitter tubing, the row-crop efficiency of drip tape, or the DIY customization of PVC systems, there’s a perfect solution for your specific garden needs.
“I was honestly amazed at how much healthier my perennial border looked after just one season with drip irrigation,” shared a homeowner from Andover. “The plants are more robust, I have fewer weeds to pull, and my water bill dropped noticeably during summer months.”
Throughout our three decades serving the Merrimack Valley, we’ve witnessed countless gardens transformed through the implementation of thoughtful drip irrigation systems. Plants that once struggled now thrive with consistent moisture. Gardens that required constant attention now largely care for themselves. Water bills that spiked every summer now remain reasonable year-round.
When selecting the right system for your landscape, consider these key factors:
For many gardeners, a hybrid approach works best—perhaps soaker hoses for perennial borders, inline emitters for foundation plantings, and drip tape for the vegetable garden. The systems can be mixed and matched to create the perfect customized solution.
Proper installation makes all the difference in system performance. While many homeowners successfully tackle DIY installation, others prefer professional guidance to ensure optimal placement, appropriate components, and maximum efficiency.
The team at McLeod Landscaping brings decades of local experience to every irrigation project. We understand the unique challenges of New England’s climate and soils, and we design systems that perform beautifully through our region’s hot summers and freezing winters.
Irrigation System Services for design & installation by McLeod Landscaping
By investing in a quality drip irrigation system, you’re making a choice that benefits your landscape, your budget, and our shared environment. The precise water delivery not only nurtures beautiful plants but also conserves one of our most precious natural resources. It’s truly a win-win that pays dividends with every growing season.
*Average costs based on national online data; actual pricing varies widely by region and project scope.
Contact McLeod Landscaping today at (978) 640-0957 or click here to schedule a consultation for retaining wall installation. Let our experienced team design and install a functional and visually appealing retaining wall that enhances your landscape.

1881 Main St Unit 1, Tewksbury, MA 01876