
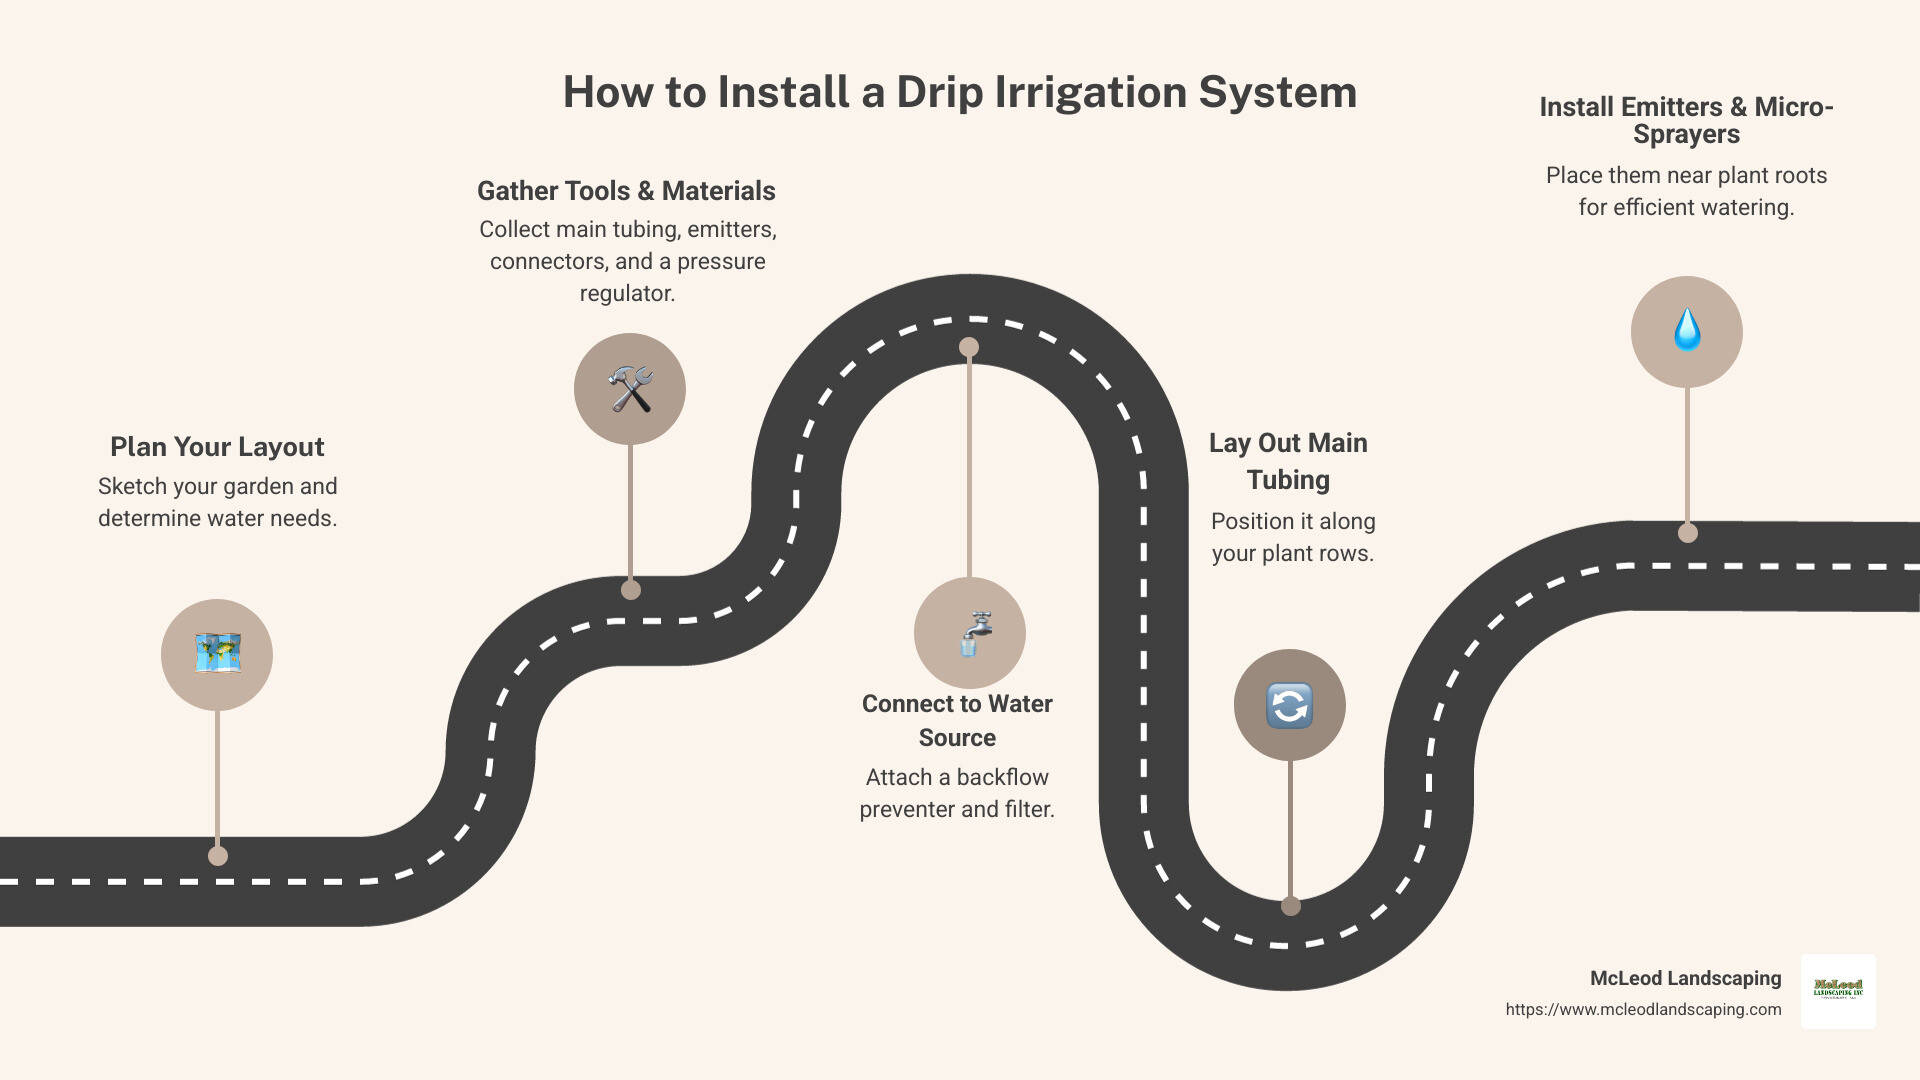
How to install drip irrigation system quickly, in five simple steps:
Drip irrigation systems are a game-changer for commercial properties and residential landscapes in the Merrimack Valley. These systems conserve water, promote healthy plant growth, and save you time. By delivering water directly to plant roots, you reduce waste and lessen the risk of diseases, ensuring lush, thriving plants.
I’m Scott McLeod, and with over three decades of experience in landscaping, I’ve seen the transformative power of drip irrigation. Join me as I guide you through the process, leveraging my expertise in how to install drip irrigation system for long-lasting efficiency and beauty. Let’s explore drip irrigation.
Basic how to install drip irrigation system vocab:
– how to install drip irrigation system for vegetable garden
– how to install an irrigation system
– how much does it cost to install an irrigation system
Drip irrigation is like giving your plants a direct line to hydration heaven. This system delivers water right to the roots, saving water and improving plant health. Let’s explore why drip irrigation is a smart choice and how it works.
Water Conservation: Drip systems are champions of water efficiency, allowing plants to absorb up to 90% of the water applied. In contrast, traditional methods only achieve 65% to 75% absorption. This means less water wasted and more going where it counts.
Improved Plant Health: By watering directly at the roots, drip irrigation reduces the risk of fungal diseases and weeds. Your plants get the moisture they need without the splash zone mess.
Time-Savings: Once set up, drip systems operate with minimal oversight. This means more time for you to enjoy your garden rather than tending to it.
Cost-Efficiency: Although the initial setup might seem like an investment, the savings on water bills and healthier plants make it worthwhile. Plus, you won’t lose plants to over or under-watering.
Versatility: Whether you have a small garden or a sprawling orchard, drip systems can be custom to fit any landscape. They are flexible and can be adjusted for future garden expansions.
To understand how to install a drip irrigation system, it’s important to know its components:
These components work together to create an efficient watering system that conserves water and promotes healthy plant growth. By understanding these parts, you’re already on your way to mastering drip irrigation.

Next up, we’ll dive into planning your drip irrigation layout, so you can get started on changing your garden.
Getting your drip irrigation system off to a good start begins with a solid plan. A well-thought-out layout ensures that your plants receive the right amount of water and that the system operates efficiently.
1. Sketch Your Garden
Begin by drawing a simple sketch of your garden. Include all plants, flower beds, and any hardscaping features like paths or fences. This visual guide will help you decide where to place the main tubing and emitters.
2. Group Plants by Water Needs
Identify plants with similar water requirements and group them together. This allows you to tailor the irrigation system to provide the appropriate amount of water for each group, enhancing efficiency.
3. Plan the Main Line Route
Decide on the best path for the main tubing. Consider the location of your water source and the shortest, most direct route to each plant group. Avoid sharp bends in the tubing, as these can restrict water flow.
Research the water requirements for each type of plant in your garden. Take into account factors like soil type, sun exposure, and climate. This will help you choose the right emitters with the appropriate flow rates for each plant.
Before you start installing your drip irrigation system, gather all the necessary tools and materials. Having everything ready will make the installation process smoother and more efficient.
Essential Tools:
Required Materials:
It’s a good idea to purchase extra materials to account for potential errors or future expansions. With your tools and materials ready, you’re well-prepared to move on to the next step: connecting your system to the water source.
Connecting your drip irrigation system begins with installing a backflow preventer. This essential component keeps your home’s water supply safe from contamination.
1. Locate Your Outdoor Faucet
Identify the faucet or valve nearest to your garden. This will be the starting point for your irrigation system.
2. Attach the Backflow Preventer
Screw the backflow preventer directly onto the faucet. Ensure it’s tightly secured to avoid leaks.
3. Check Local Regulations
Some areas have specific requirements for backflow preventers. It’s wise to check local regulations to ensure compliance.

Once the backflow preventer is in place, the next step is to attach the pressure regulator and filter. These components ensure a steady water flow and prevent debris from clogging the system.
1. Connect the Pressure Regulator
Attach the pressure regulator to the backflow preventer. This device controls the pressure, ensuring it stays within a safe range for your system.
2. Add the Filter
Next, attach the filter to the pressure regulator. This step is crucial for keeping dirt and particles out of your tubing.
3. Use a Hose Swivel
Connect a hose swivel to the filter’s threaded opening. This allows for easy attachment of the main tubing and provides a secure connection.
With these components securely in place, your system is now ready to distribute water efficiently to your garden. The next step involves laying out the main tubing to ensure water reaches all areas effectively.
Now that your water source is ready, it’s time to lay out the main tubing of your drip irrigation system. This step is crucial for distributing water efficiently throughout your garden.
1. Start at the Water Source
Begin by unrolling the ½-inch tubing from your water source. Follow the path you planned in your garden sketch.
2. Plan the Tubing Path
Route the tubing along the paths you’ve mapped out. Make sure to leave some slack in the tubing to allow for expansion and contraction due to temperature changes. This prevents the tubing from becoming too tight and potentially cracking.
3. Secure with Ground Stakes
Use ground stakes every few feet to keep the tubing in place. This helps prevent movement and ensures the tubing stays on the planned path. Be careful not to puncture the tubing when installing stakes.
4. Avoid Sharp Bends
Make sure to avoid sharp bends in the tubing. Sharp bends can restrict water flow and might damage the tubing over time. Instead, use gentle curves to maintain a steady flow of water.
1. Elbow Connectors for Turns
For any 90-degree turns in your tubing path, use elbow connectors. These connectors help maintain the flow of water without creating sharp bends.
2. Tee Connectors for Branching
If you need to branch off the main line to water different areas, use tee connectors. These allow you to split the tubing and direct water to multiple locations.
3. End Caps for Open Ends
Once you’ve laid out the main tubing, close off any open ends with end caps. This prevents water from leaking out and ensures all water is directed towards your garden.
With the main tubing in place and properly secured, your system is now set to deliver water efficiently. Next, you’ll need to install emitters and micro-sprayers to target your plants directly.
Now that your main tubing is in place, it’s time to add the components that will deliver water directly to your plants. This involves installing emitters for individual plants and micro-sprayers for areas with ground cover.
1. Use a Hole Punch
Start by using a hole punch to create small openings in the main tubing near each plant. This is where you’ll insert the emitters.
2. Insert Barbed Emitters
Gently push barbed emitters into the holes you’ve punched. These emitters release water directly to the base of each plant. Make sure they fit snugly to prevent leaks.
3. Position Emitters Correctly
Place emitters about 6-12 inches from the plant stems. This ensures water is delivered right to the root zone. For larger plants or trees, consider using multiple emitters for even coverage.
4. Choose the Right Emitter Flow Rate
Select emitters with flow rates that match the water needs of your plants. Different plants may require different amounts of water, so adjust accordingly for optimal plant health.
1. Connect ¼-Inch Tubing
For areas with dense plant life or ground cover, attach ¼-inch tubing to the main line using a tee connector. This smaller tubing will carry water to the micro-sprayers.
2. Position the Sprayers
Run the ¼-inch tubing to the area you want to water and connect micro-sprayers to the ends. Use stakes to position the sprayers at the right height, ensuring they cover the intended area without wasting water.
3. Fine-Tune Sprayer Placement
Adjust the position of each sprayer to achieve even coverage. This might involve moving them slightly to avoid dry spots or overspray.
With the emitters and micro-sprayers installed, your drip irrigation system is ready to provide efficient, targeted watering to your garden. Next, let’s tackle some common questions about maintaining and optimizing your system.
Installing a drip irrigation system is quite manageable, even for beginners. The process doesn’t require many tools—just some basic items like pruning shears, a hole punch, and a shovel. Most of the materials, such as main tubing, emitters, and connectors, are readily available at garden centers or online. A big advantage is that you don’t need extensive landscaping experience to set it up. With a clear plan and the right materials, you can have your system up and running in just a day.
One major downside to drip irrigation is the need for careful planning and placement of the tubing. If you need to replace plants or rearrange your garden, it can be tricky to reposition the tubes without disturbing the system. This setup also means that you have to consider the specific water needs of each plant type. For instance, plants with different water requirements should be grouped separately to ensure efficient watering. Additionally, while the system is largely maintenance-free, regular checks are necessary to ensure emitters aren’t clogged and that the tubing remains in place.
The depth at which you bury your drip irrigation lines depends on the soil type and the water absorption needs of your plants. Generally, lines should be buried just beneath the surface, about 2 to 6 inches deep. This depth protects the tubing from damage while ensuring that water reaches the roots effectively. In sandy soils, you might need to place the lines a little deeper to prevent water from evaporating too quickly. Always consider the specific needs of your plants and soil conditions to optimize water absorption.
Installing a drip irrigation system offers numerous benefits that can transform your garden into a thriving oasis while conserving water. This efficient watering method targets plant roots directly, reducing water waste and promoting healthier plant growth. Once installed, your garden can flourish with minimal effort, as the system operates automatically.
Regular maintenance is key to keeping your drip irrigation system in top shape. Monthly checks during the growing season will help you spot any damaged tubing or clogged emitters. These quick inspections prevent water waste and ensure your plants receive the right amount of moisture. In colder climates, winterizing your system by draining water and insulating components will protect it from freeze damage.
At McLeod Landscaping, we take pride in offering a comprehensive range of services to meet your landscaping needs. Whether you’re looking to install a new irrigation system or maintain an existing one, our team is here to help. With over 30 years of experience, we provide expert guidance and reliable service to ensure your landscape remains lush and vibrant.
For more information on how we can assist with your irrigation needs, visit our Irrigation System Services page. Let us help you create a sustainable and beautiful outdoor space with our expert drip irrigation solutions.
Contact McLeod Landscaping today at (978) 640-0957 or click here to schedule a consultation for retaining wall installation. Let our experienced team design and install a functional and visually appealing retaining wall that enhances your landscape.

1881 Main St Unit 1, Tewksbury, MA 01876