Looking for lawn irrigation system repair help? Here’s what you need to know:
A properly functioning lawn irrigation system repair is essential for maintaining a lush, green landscape. When your sprinklers start shooting in the wrong direction, creating puddles, or simply refuse to turn on, it’s not just an annoyance—it’s potentially damaging to your lawn and wallet. Water waste from leaking pipes or misaligned heads can quickly add up on your utility bill, while dry patches from malfunctioning zones can leave your carefully cultivated landscape looking patchy and unhealthy.
The good news? Many common sprinkler system issues can be diagnosed and fixed without specialized skills or expensive equipment. With some basic troubleshooting and a few simple tools, you can solve up to 90% of typical irrigation problems in under an hour.
I’m Scott McLeod, owner of McLeod Landscaping with over three decades of experience in professional lawn irrigation system repair and maintenance throughout the Merrimack Valley area, helping hundreds of homeowners and commercial property managers keep their irrigation systems running efficiently.
Lawn irrigation system repair basics:
– how does a lawn irrigation system work
– types of lawn irrigation systems
– average cost for lawn irrigation system
Ever walked outside to find a mini geyser erupting in your yard or mysterious puddles forming when it hasn’t rained? After helping thousands of homeowners across Tewksbury, Andover, Billerica, and surrounding communities, I’ve finded that understanding the “why” behind sprinkler problems is half the battle in effective lawn irrigation system repair.
Nothing says “irrigation problem” quite like water where it shouldn’t be. You might spot puddles forming during system operation, persistently soggy patches in your lawn, water bubbling up from the ground, or that dreaded surprise when your water bill arrives.
Most leaks happen at connection points where pipes meet fittings, or where physical damage has occurred. The usual suspects? Aggressive tree roots seeking moisture, winter freeze damage, or accidental hits from shovels and lawn equipment. These issues not only waste water but can undermine your landscape over time.
Sprinkler heads live a tough life! They’re constantly battling:
Lawnmower encounters when they sit too high, foot traffic from people walking across the lawn, debris buildup from soil and grass clippings, internal seal failures causing constant dripping, and seasonal ground shifts that throw them out of alignment.
A damaged head might spray wildly in all directions, create an impressive but unwanted fountain, or stubbornly refuse to pop up at all. The good news? Head replacements are among the simplest DIY fixes.
When your sprinklers seem more like gentle mist than effective watering tools, pressure issues are likely the culprit. Your system might be suffering from partial pipe blockages, too many heads competing for water on a single zone, pressure-robbing leaks, municipal water supply fluctuations, or valves that aren’t fully opening.
Think of valves as the traffic controllers of your irrigation system. When they malfunction, entire zones can go haywire. Common valve issues include those that refuse to open (leaving zones bone dry), won’t close properly (creating constant leaks), have torn internal diaphragms causing intermittent weeping, or solenoids that fail to respond to electrical signals.
Modern irrigation systems rely heavily on electrical components to orchestrate the watering dance. Problems often include controller malfunctions, wiring damaged by digging or curious critters, failed solenoids that can’t activate valves, tripped circuit breakers cutting power to the system, or transformer failures that leave everything dead in the water.
The brain of your system deserves special attention. Controllers commonly suffer from accidental programming changes, dead backup batteries, corroded terminal connections, rain sensors that get stuck in “rain detected” mode, or improper zone timing that leaves some areas parched while others become waterlogged.

Sometimes the issue isn’t a mechanical failure but a design or adjustment problem. You might have heads spaced too far apart, incorrect nozzle types for specific areas, spray patterns pointing in the wrong direction, heads installed at improper heights, or new obstacles like growing shrubs blocking the spray.
The aftermath of irrigation trenching can also leave visible lawn scars, as shown in this example. Proper restoration after installation or repair work is essential for maintaining your lawn’s appearance and health.
For deeper insights into specific problems, our guide on sprinkler system troubleshooting common issues and solutions provides additional details.
Before grabbing your tools, take time for these simple diagnostic steps that can save hours of frustration:
Take a leisurely walk around your property while the system runs. Look for obvious culprits like geysers or misdirected spray, heads refusing to pop up, unusual puddles or wet areas, dry patches where water should reach, or water bubbling up from underground.
Running each zone for just 2-3 minutes can reveal telling differences: which zones work perfectly and which struggle, pressure variations between zones, coverage patterns and potential gaps, and heads that rotate poorly or get stuck mid-cycle.
A simple pressure gauge attached to a test fitting or outdoor faucet will quickly tell you if your system is receiving adequate pressure. Most residential systems need 40-65 PSI for optimal performance.
For those mysterious electrical gremlins, a basic multimeter can check controller output (look for 24-28 VAC), solenoid resistance (typically 20-60 ohms), and wiring continuity to identify breaks.
When wires disappear underground, a wire locator or tone probe becomes invaluable, helping you find buried valves or locate breaks without turning your yard into an archaeological dig site.
Armed with this diagnostic knowledge, you’ll be well-prepared to tackle the most common lawn irrigation system repair challenges – or know when it’s time to call in professional help.
Ready to tackle that sprinkler problem yourself? With the right approach, many lawn irrigation system repair jobs are perfectly manageable for homeowners with basic DIY skills. I’ve helped countless property owners save money by handling simple repairs themselves—here’s what you need to know to join their ranks.
Before you start digging, gather these must-have items for effective lawn irrigation system repair:
A well-stocked repair kit should include a quality PVC cutter (much cleaner than a saw), channel-lock pliers for gripping stubborn fittings, and both flathead and Phillips screwdrivers for various adjustments. Don’t forget a small garden trowel or shovel—you’ll need it for carefully exposing buried components without causing additional damage.
For materials, keep replacement heads that match your existing system on hand, along with some PVC pipe and fittings (typically ½” or ¾” depending on your system). Slip couplings are absolute lifesavers for pipe repairs, allowing you to make connections without excessive digging. Waterproof wire connectors are essential for any electrical work—regular wire nuts will corrode underground and fail prematurely.

Safety should never be an afterthought. Protect your hands with work gloves, your eyes with safety glasses, and your knees with proper knee pads—you’ll thank me after an hour of kneeling on rocky soil! And please, before any digging, call 811 to have underground utilities marked. This free service prevents the nightmare scenario of hitting gas or electrical lines. Also, always turn off your system’s water supply before starting any repair work.
For a complete breakdown of recommended tools and materials, check out our irrigation system repair essentials guide.
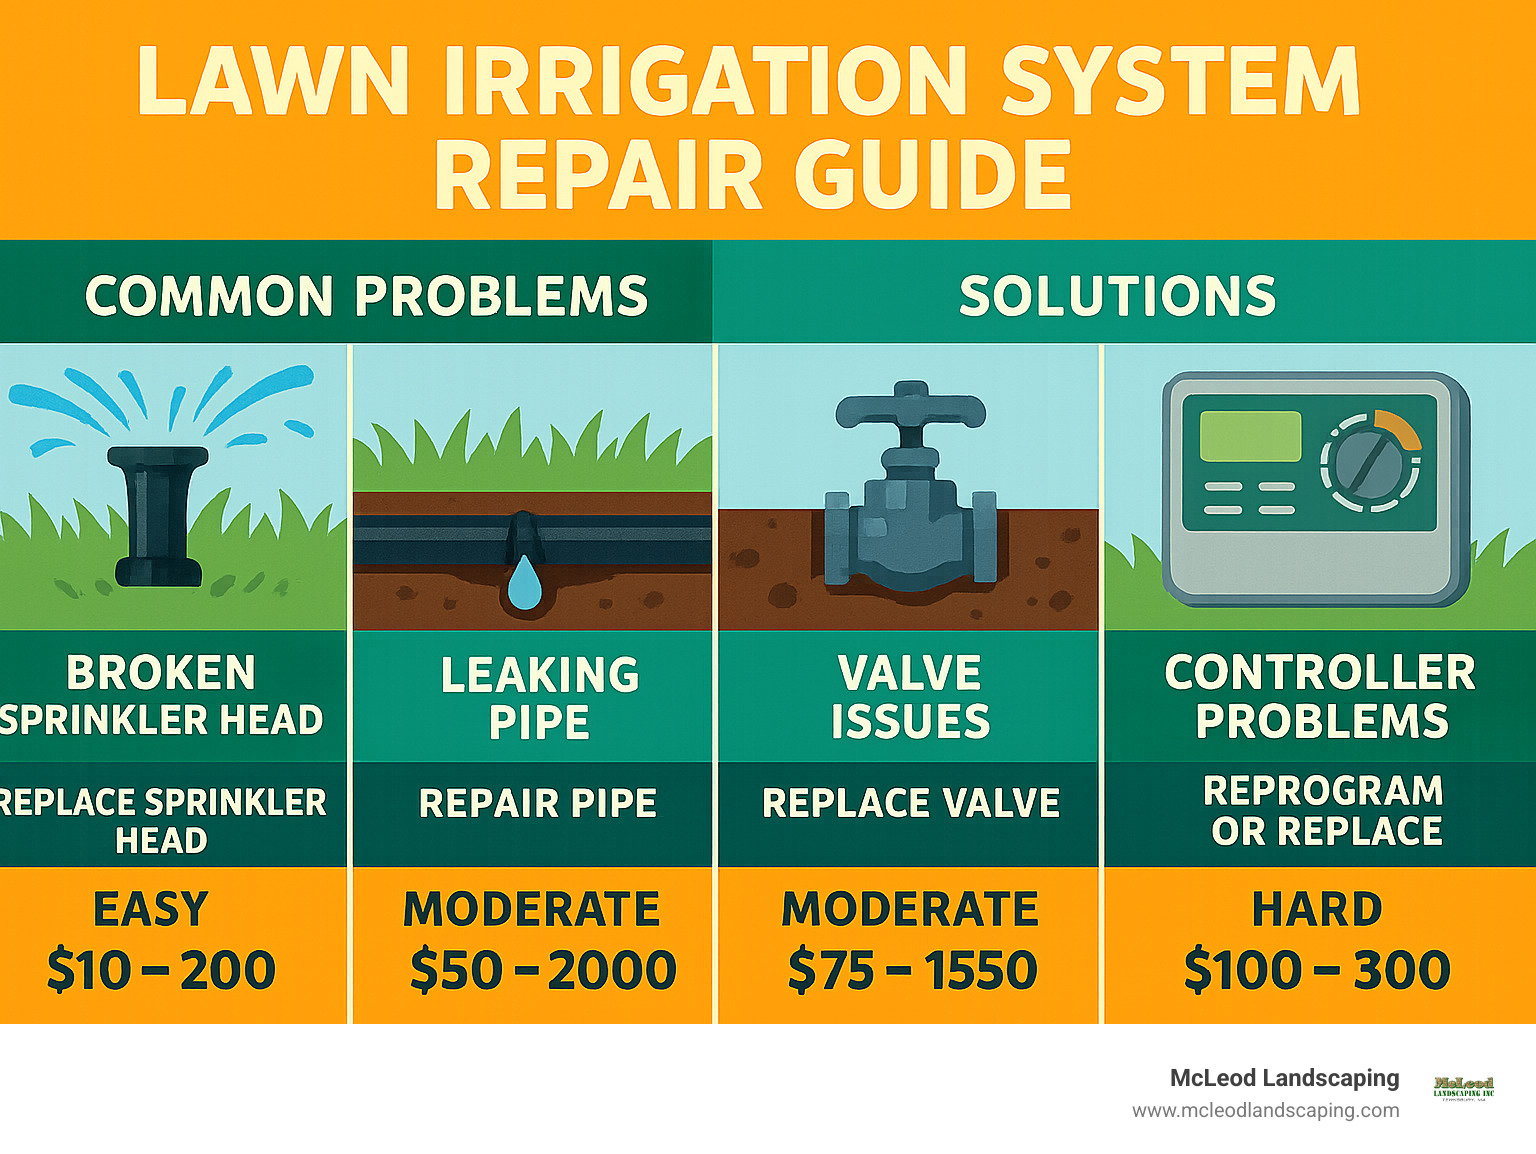
Broken sprinkler heads are probably the most common repair we see, and fortunately, they’re relatively simple to fix. Whether you’ve got a head that’s spraying wildly or one that’s been decapitated by a lawnmower, here’s how to make it right:
Start by running the zone briefly to identify exactly which head needs replacing. Once located, carefully dig around it, creating a small hole about 5-6 inches wide. Be gentle—the goal is to expose the head without damaging the pipe or riser below it.
Grip the body of the head (not the pop-up stem, which can break easily) and unscrew it counterclockwise. Keep dirt from falling into the open pipe—this can clog your new head before it even gets started. Clean the riser threads and apply fresh Teflon tape for a leak-free seal.
Hand-tighten the new head—and I mean hand-tight only! Overtightening is a common mistake that can crack the fitting or the head itself. Make sure the head sits vertically and at the proper height, typically flush with the soil surface.
Test your work by running the zone, adjust the spray pattern as needed, then backfill and tamp the soil around the head. For detailed, step-by-step instructions with photos, this broken head how-to guide is excellent.
Found a mysterious soggy spot in your otherwise perfect lawn? You’re likely dealing with an underground leak in one of your lateral lines. Here’s how to handle it:
First, locate the exact spot by running the system and looking for bubbling water or unusually wet areas. Mark it, turn off the water, and start digging carefully around the leak. You’ll want a working space about 1-2 feet long and deep enough to work comfortably—usually 8-12 inches.
Once exposed, dry the pipe as much as possible and use your PVC cutter to remove the damaged section, making clean, straight cuts. Measure and cut a replacement piece slightly shorter than the gap—this is where slip couplings become your best friend. These special fittings slide to accommodate the pipe without requiring additional digging space.
Apply PVC primer followed by cement to all connection points, then assemble your repair. Hold the connections firmly for about 30 seconds to allow the cement to set initially. For best results, wait about two hours before pressurizing the system again.
If you’ve finded tree roots are the culprit behind your leak, consider rerouting the pipe around the root zone. It requires more work initially but prevents the frustration of repeated repairs in the same spot.
Valve problems can be tricky because they often combine mechanical and electrical issues. When a valve won’t open, start by locating the valve box and removing the cover. Try manual operation first by turning the bleed screw or manual lever—if water flows, you know the problem is electrical rather than mechanical.
For electrical valve issues, test the solenoid with a multimeter (you should see 20-60 ohms of resistance) and check that your controller is outputting 24-28 VAC. Replacing a faulty solenoid is straightforward: unscrew the old one, install the new one hand-tight, and reconnect the wires using proper waterproof connectors.
If your valve won’t close completely or makes an annoying “weeping” sound, the internal diaphragm is likely torn or dirty. After shutting off the water, disassemble the valve by removing the top screws. Inspect the diaphragm for tears or debris, and either clean or replace it as needed. During reassembly, be careful not to overtighten the screws—just snug is perfect.
For more detailed valve repair guidance, our fix lawn sprinkler system guide covers additional troubleshooting steps.
Electrical issues might seem intimidating, but many can be resolved with basic troubleshooting. If your controller display is blank or zones aren’t activating, first verify the controller is receiving power. Test the transformer with a multimeter—it should output 24-28 VAC. If it’s outputting less than 22 volts, it needs replacement.
Wire breaks are another common electrical issue. Using a multimeter set to ohms/resistance mode, disconnect field wires from the controller and test each zone wire against the common wire. A reading of infinity indicates a break in that circuit. Wire trackers or tone probes can help locate breaks without excessive digging.
Once found, repair breaks by cutting out the damaged section and joining the wires using waterproof connectors. Always bury repaired wiring at least 8 inches deep to prevent future damage from aerators or other lawn equipment.
Don’t forget to check your rain sensor if your system mysteriously shuts down during scheduled times. Test it by wetting the sensor and observing if it correctly interrupts scheduled watering as designed.
After completing any lawn irrigation system repair, thorough testing ensures your work pays off. Run each zone individually for 3-5 minutes, checking for leaks at repair sites and all visible connections. This is also the perfect time to adjust head coverage for proper overlap (typically 80-100%) and ensure consistent watering across your lawn.
Set head heights flush with the soil surface—this prevents the heartbreak of seeing your newly repaired heads decapitated by the next mowing. For sloped areas, implement cycle-soak programming to prevent runoff and water waste.
Fine-tuning is an ongoing process. I always recommend observing your lawn’s response over a week or two after repairs, making small adjustments as needed. Your goal is balanced zone run times that account for variations in sun exposure, plant types, and soil conditions across your property.
While many lawn irrigation system repair tasks are DIY-friendly, some situations call for professional expertise. Understanding when to call in the pros and what to expect regarding costs can help you make informed decisions about your irrigation system maintenance.

Sometimes it helps to see the numbers side by side when deciding whether to tackle a repair yourself or call in the experts. I’ve compiled this handy comparison based on typical scenarios we encounter:
| Repair Type | DIY Cost (Parts) | Professional Cost (Parts + Labor) | DIY Time | Pro Time |
|---|---|---|---|---|
| Replace sprinkler head | $10-$20 | $50-$100 | 30 min | 15 min |
| Fix lateral line leak | $15-$30 | $150-$300 | 2-3 hrs | 1 hr |
| Replace valve | $20-$90 | $150-$350 | 1-2 hrs | 45 min |
| Repair wiring | $10-$25 | $200-$500 | 2-4 hrs | 1-2 hrs |
| Replace controller | $100-$300 | $250-$650 | 1-2 hrs | 1 hr |
| Mainline repair | $50-$100 | $300-$850 | 4-8 hrs | 2-3 hrs |
Note: These are average costs based on internet data and not actual costs for McLeod Landscaping.
Most homeowners spend around $270 on sprinkler repairs, though this varies widely depending on the issue. Simple fixes like swapping out a broken head might cost as little as $50 professionally, while major problems like a burst mainline could run up to $850 for professional repair.
The DIY route obviously saves on labor costs, but remember to factor in your time, tool purchases, and the potential for follow-up repairs if something goes wrong. For more detailed cost information, check out these average sprinkler repair cost insights.
I’m all for DIY spirit, but after three decades in the business, I’ve seen plenty of situations where calling a pro isn’t just convenient—it’s essential. Here are the scenarios where professional help truly pays off:
Mainline breaks demand immediate attention from a professional. These pipes operate under constant, high pressure and require specialized fittings and techniques. A burst mainline can quickly turn your yard into a swamp and send your water bill through the roof if not properly addressed.
Multiple zone failures often point to deeper system issues. When several zones stop working simultaneously, the problem typically lies in your controller, pump system, or main valve—components that require professional diagnostic equipment and expertise to troubleshoot efficiently.
Backflow device issues shouldn’t be DIY projects. These devices protect your drinking water from contamination and are regulated by local codes in most areas. Repairs typically require certification, and improper installation could create health hazards or result in failed municipal inspections.
Complex electrical problems can be incredibly frustrating without the right tools. Those mysterious electrical issues, especially involving buried wires or lightning damage, might have you digging up half your yard without specialized equipment like wire tracers.
Permit requirements vary by location. Some jurisdictions require permits for significant irrigation modifications, and professionals understand these local regulations and ensure your system remains code-compliant.
Warranty considerations matter too. DIY repairs may void manufacturer warranties on components or installation guarantees. Professional repairs, on the other hand, often come with workmanship warranties that provide peace of mind.
Regular maintenance is the secret to extending your system’s life and reducing emergency lawn irrigation system repair needs. A well-maintained sprinkler system typically lasts 10-15 years, and with proper care, you might squeeze up to 20 years from your investment.
Spring Start-up is crucial after winter dormancy. Think of it as waking your system gently after its long nap. We recommend slowly pressurizing the system to prevent water hammer damage, inspecting for winter freeze damage, cleaning filters, checking valve operation, testing and adjusting all heads for proper coverage, and updating your controller programming for spring conditions.
Midsummer Tune-up keeps everything running smoothly during peak demand. By mid-season, it’s worth checking for clogged nozzles (especially in areas with hard water), adjusting any heads that might have shifted due to soil settling, verifying proper pressure throughout the system, optimizing run times based on current weather patterns, and inspecting for any damage from lawn mowers or other equipment.
Fall Blow-out is non-negotiable in our New England climate. Before the first freeze, you’ll want to remove water from all lines using compressed air, insulate any exposed components, set your controller to “rain” or “off” mode, protect backflow devices from freezing, and document any issues to address in spring. Skip this step, and you’ll likely be facing major repairs when spring arrives.
Water-Saving Upgrades offer both environmental and financial benefits. Consider installing pressure regulators to prevent misting and waste (which can save up to 30% of water), upgrading to high-efficiency nozzles, investing in a smart controller that adjusts to weather conditions (potentially qualifying for local rebates), adding soil moisture sensors to prevent unnecessary watering, or converting planting beds to water-efficient drip irrigation.
The return on investment for these upgrades can be substantial—many of our customers see their water bills drop by 20-40% after implementing water-saving technology. For comprehensive information about maintaining your system year-round, visit our lawn sprinkler system maintenance guide.
Wondering about the price tag for fixing your sprinkler system? You’re not alone! Based on internet data (not McLeod Landscaping pricing), most homeowners spend between $130 and $400 for sprinkler repairs, though this varies widely depending on what’s wrong.
Simple fixes like swapping out a broken sprinkler head might run as little as $50 when done professionally. On the other end of the spectrum, complex repairs like fixing a burst mainline pipe can reach upwards of $850 when you factor in excavation, parts, and labor.
The DIY approach can dramatically reduce these costs. For example, that cracked PVC pipe that might cost $200 or more for professional service? You could tackle it yourself for around $11 in materials if you’re comfortable doing the work. The savings come primarily from eliminating labor costs, which typically make up 60-70% of professional repair bills.
This question really comes down to your comfort level, skills, and the nature of the problem. Here’s a friendly guide to help you decide:
Roll up your sleeves and DIY when:
– You’ve got some basic plumbing or electrical know-how
– The problem is obvious (like that sprinkler head your teenager accidentally kicked)
– You have a free afternoon and the necessary tools
– The repair is in a lateral line (not the main supply line)
– You’re physically able to do some digging and ground-level work
Better call in the experts when:
– Multiple zones have mysteriously stopped working
– You’ve tried troubleshooting but can’t pinpoint the issue
– The problem involves the mainline (which is constantly under high pressure)
– You need complex electrical diagnostics
– Local regulations require certified technicians for certain repairs
– You want the peace of mind of a professional warranty
– Your weekend is too valuable to spend troubleshooting sprinklers!
There’s no shame in calling for help. Even experienced DIYers sometimes encounter irrigation puzzles that are best solved by professionals with specialized equipment and years of experience.
Regular maintenance is the secret to a long-lasting, efficient irrigation system. Think of it like your car—regular check-ups prevent bigger problems down the road.
Monthly quick checks during watering season take just 15 minutes but pay huge dividends. Simply walk your property while the system runs, looking for obvious issues like geysers from broken heads, areas not getting water, or sprinklers watering the sidewalk instead of your lawn. Clear away grass clippings or debris from spray heads and adjust any that have shifted.
Seasonal attention keeps everything running smoothly year-round:
– Spring wake-up (March/April): Carefully reactivate your system after winter, inspect for freeze damage, and update your watering schedule for spring conditions.
– Midsummer tune-up (June/July): Check for clogged nozzles, adjust for any growth changes in your landscape, and optimize run times for hot weather.
– Fall winterization (October/November): Perhaps the most critical service—properly removing water from the system before freezing temperatures arrive can prevent costly repairs in spring.
Annual professional inspection is worth considering even for dedicated DIYers. A trained eye can spot developing issues before they become problems and test components like backflow preventers (often required by local water authorities).
With this level of care, your irrigation system can faithfully serve your landscape for 10-15 years, and potentially up to 20 years. Not only will you extend the system’s lifespan, but you’ll also save water, keep your landscape healthier, and avoid those emergency repair calls on the hottest day of summer!

There’s something truly satisfying about a perfectly functioning irrigation system—those reliable soldiers that rise from the ground on schedule, delivering just the right amount of water to keep your landscape thriving. With the lawn irrigation system repair knowledge we’ve shared, you’ve now got the tools and confidence to tackle many common issues yourself, preserving both your lawn’s beauty and your bank account.
As we wrap up, let’s remember what matters most for keeping your sprinklers sprinking:
Regular inspections are your best defense against costly repairs. A quick monthly walkthrough while your system runs can catch small issues before they become landscape disasters. Those few minutes can save you hundreds in repair costs and thousands of gallons in wasted water.
You don’t need a garage full of specialized equipment—just a few basic tools and replacement parts will handle most common sprinkler problems. A PVC cutter, some slip couplings, and a few replacement heads can make you the hero when sprinkler emergencies strike.
Always prioritize safety in your repair work. That quick call to 811 before digging could prevent a dangerous and expensive utility strike. And remember to shut off your water supply before opening up any pressurized components—unless you’re looking to create an impromptu backyard fountain!
Know when to put down the tools and pick up the phone. While DIY repairs can be satisfying and cost-effective, some situations truly call for professional expertise. Complex electrical issues, mainline breaks, or backflow problems are best handled by certified technicians with specialized equipment.
Seasonal maintenance isn’t just a good idea—it’s essential for system longevity and water conservation. Those spring start-ups and fall winterizations pay dividends in extended system life and reduced repair costs.
At McLeod Landscaping, we’ve spent more than three decades helping homeowners and businesses throughout the Merrimack Valley maintain efficient, reliable irrigation systems. Whether you’re in Tewksbury, Andover, Billerica, or anywhere in our service area, we understand that a properly functioning irrigation system is the foundation of a beautiful landscape.
For those repairs that fall outside your comfort zone or when time just isn’t on your side, our certified irrigation technicians provide prompt, professional service backed by our workmanship guarantee. We also offer comprehensive seasonal maintenance programs that can prevent problems before they start.
To learn more about our complete range of irrigation services, visit McLeod Landscaping irrigation services.
With thoughtful attention to lawn irrigation system repair and regular maintenance, you can enjoy a vibrant, water-efficient landscape for years to come. Don’t lose your sprinkles—keep them working at their best with these tips and our professional support whenever you need a helping hand.
Contact McLeod Landscaping today at (978) 640-0957 or click here to schedule a consultation for retaining wall installation. Let our experienced team design and install a functional and visually appealing retaining wall that enhances your landscape.

1881 Main St Unit 1, Tewksbury, MA 01876