
Lawn sprinkler installation is the process of setting up an automated watering system that delivers consistent moisture to your grass and plants. If you’re looking to install a lawn sprinkler system, here’s a quick overview:
A properly installed sprinkler system saves time, conserves water, and ensures your landscape stays healthy year-round.
When it comes to a lush, green lawn, consistent watering is absolutely essential. Manual watering is time-consuming and often results in uneven coverage, leading to dry patches or water waste. A properly installed sprinkler system delivers precise amounts of water exactly where it’s needed, when it’s needed.
I’m Scott McLeod, owner of McLeod Landscaping with over three decades of experience in landscape design and lawn sprinkler installation throughout the Merrimack Valley area. Throughout my career, I’ve installed hundreds of irrigation systems for both residential and commercial properties, helping clients achieve beautiful, sustainable landscapes while reducing their water usage and maintenance time.
Lawn Sprinkler Installation word roundup:
– lawn drip irrigation system
– irrigation sprinkler
– how does a lawn irrigation system work
Thinking about installing a sprinkler system? Let’s talk about what you’ll need to budget and plan for before grabbing that shovel. The typical range for a complete lawn sprinkler installation falls between $3,500 and $10,000, with most homeowners finding themselves somewhere in the middle of that spectrum.
“Many homeowners assume yard size is the biggest cost factor, but that’s not quite right,” shares our senior irrigation specialist at McLeod Landscaping. “We actually price systems based on the number of irrigation zones required, not just square footage.”
Each zone typically ranges between $500 and $700, plus you’ll need a backflow prevention device (around $600) to keep your drinking water safe. It’s worth noting that about 60% of your total cost typically goes toward labor—which explains why DIY installations can save money if you have the skills and time.
Before you move forward with any installation plans, two critical measurements will determine your system’s design:
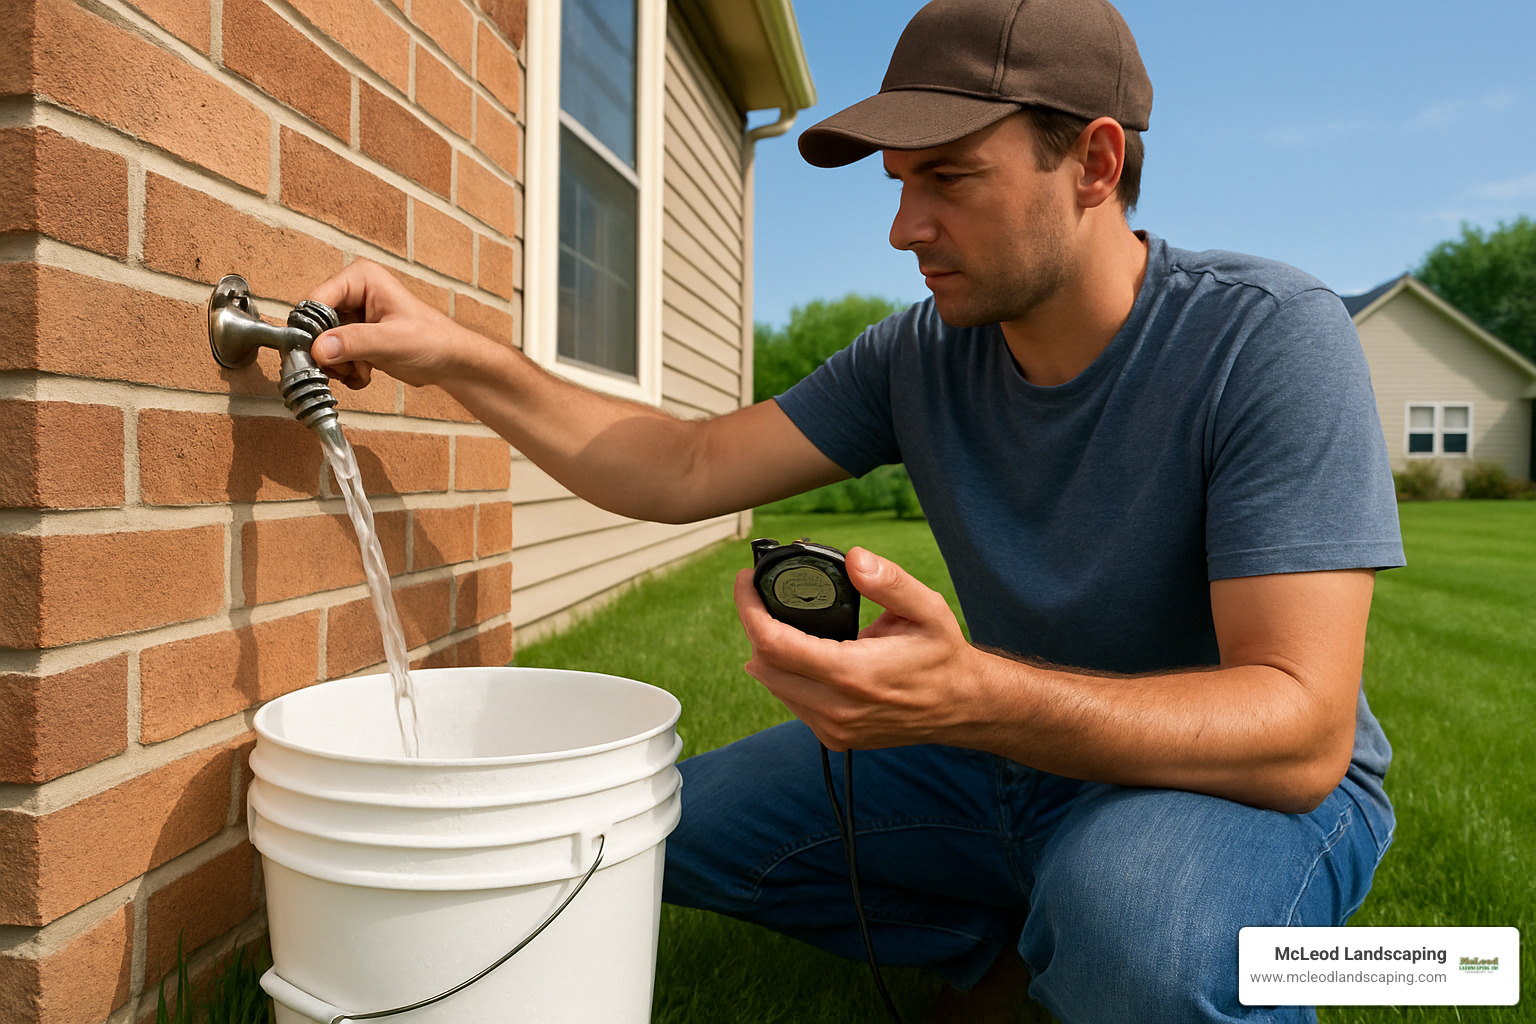
Water pressure (PSI): Most residential sprinkler systems need between 40-70 PSI to function properly. Too low, and your sprinklers won’t pop up or spray correctly. Too high, and you risk damaging components.
Flow rate (GPM): This tells you how many sprinkler heads can run at once without overtaxing your water supply.
Not sure about your flow rate? The bucket test is beautifully simple. Find a 5-gallon bucket, time how long it takes to fill from your outdoor spigot, then do a quick calculation: divide 5 by the seconds it took to fill, then multiply by 60. For example, if your bucket fills in 30 seconds: 5 ÷ 30 = 0.167, then 0.167 × 60 = 10 GPM.
The size of your lawn naturally affects the overall investment in your lawn sprinkler installation:
For small lawns (up to 1/4 acre), you might start around $1,000 for a basic setup. Medium lawns (1/4 to 1/2 acre) typically range from $2,000-$4,000, while large properties over 1/2 acre often exceed $5,000.
When calculated per square foot, costs generally fall between $0.20-$1, with larger yards benefiting from economies of scale. A typical 1/8-acre yard (roughly 5,000 square feet) might require an investment between $2,500 and $5,000 for a complete system.
Note: These are average costs based on internet data and not actual costs for McLeod Landscaping services.
| Feature | Above-Ground System | In-Ground System |
|---|---|---|
| Cost | $300-$500 | $3,500-$6,500 |
| Installation | DIY-friendly | Professional recommended |
| Aesthetics | Visible hoses and sprinklers | Hidden components |
| Durability | 3-5 years | 10-15+ years |
| Winterization | Simple disconnection | Requires blowout service |
| Property Value | Minimal increase | Up to 12% increase |
While above-ground systems might seem tempting for their lower initial cost, in-ground systems typically offer significantly better longevity, aesthetics, and can actually increase your property value. For most homeowners seeking a long-term solution, the investment in a professional in-ground system pays dividends in both lawn health and property value.
Looking for detailed cost information? Check out our Cost to Install Lawn Sprinkler System guide for a comprehensive breakdown.
Creating the perfect blueprint for your lawn sprinkler installation is like planning a great party—everyone needs to get the right amount of refreshment! A thoughtfully designed system ensures your entire landscape gets proper hydration without wasting precious water.
Your yard isn’t just one uniform space—it’s a collection of micro-environments with different watering needs. That’s why most properties need multiple irrigation zones.
“The average irrigation zone has between 5 and 9 sprinkler heads, and a typical lawn requires between 5 and 9 irrigation zones,” our irrigation team leader often tells clients. “Even standard residential properties typically need a minimum of 5 zones, while larger landscapes with diverse features might require 7 or more.”
Why so many zones? Well, there are three main reasons: First, your home’s water pressure can only support a certain number of sprinklers running simultaneously. Second, different plants have different thirsts—your lawn, flower beds, and shade trees each need their own watering schedule. Finally, that sunny south-facing slope dries out much faster than the shady area under your maple tree.
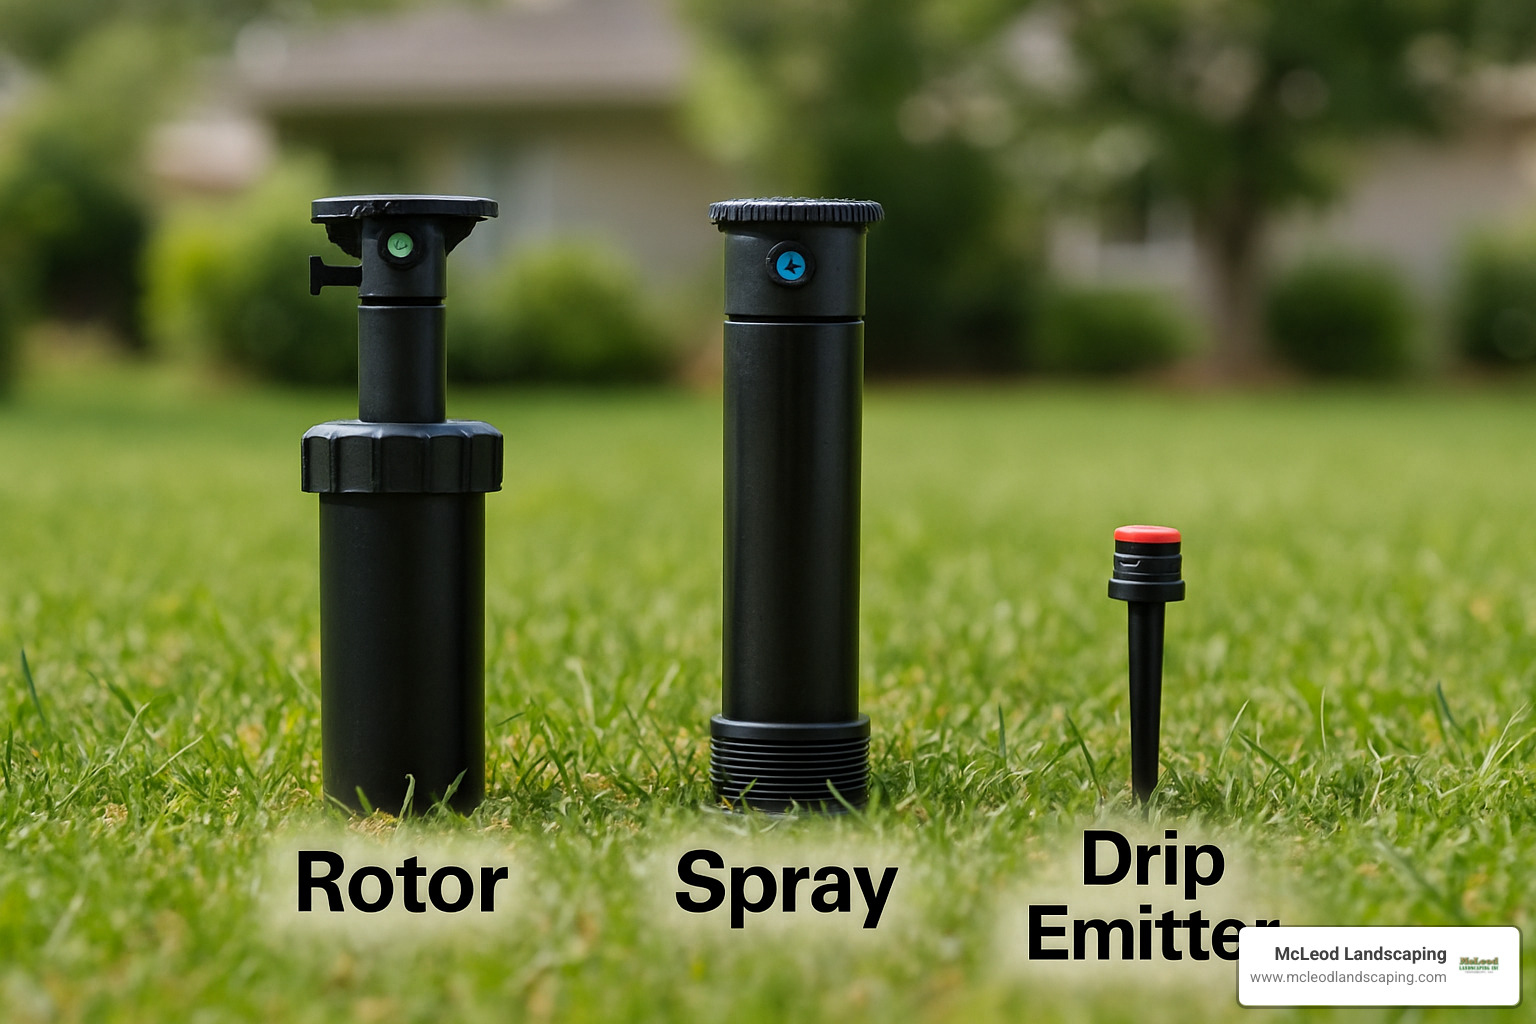
Choosing the right sprinkler heads is crucial for efficient watering. Think of them as different tools in your watering toolbox:
Rotor Heads are the marathoners of the sprinkler world. They rotate streams of water over large areas (15-45 feet), making them perfect for open lawns. They’re more water-efficient for large spaces and operate at higher pressures (30-50 PSI).
Spray Heads are your precision tools, designed for smaller areas with 10-15 feet spacing. They spray fixed patterns of water, making them ideal for narrow strips between driveways or smaller sections of lawn. They’re happy with lower pressures (20-30 PSI).
Drip Lines are the nurturing gardeners of irrigation, delivering water directly to plant roots in gardens and flower beds. They minimize evaporation and runoff by targeting specific areas—perfect for those prized perennials!
Bubblers are designed specifically for trees and shrubs, providing slow, deep watering that encourages strong root growth. They’re like giving your woody plants a long, satisfying drink rather than a quick splash.
One concept you’ll hear us emphasize constantly in lawn sprinkler installation is “head-to-head coverage.” This isn’t just irrigation jargon—it’s the secret to a uniformly green lawn.
“If you don’t have head-to-head coverage, you’ll end up with dry patches in your lawn,” our irrigation specialist often explains. “This is one of the most common mistakes in DIY installations.”
Head-to-head coverage means the water from one sprinkler should reach all the way to the adjacent sprinklers. Think of it as a water relay race where every inch of your lawn gets passed the baton of moisture.
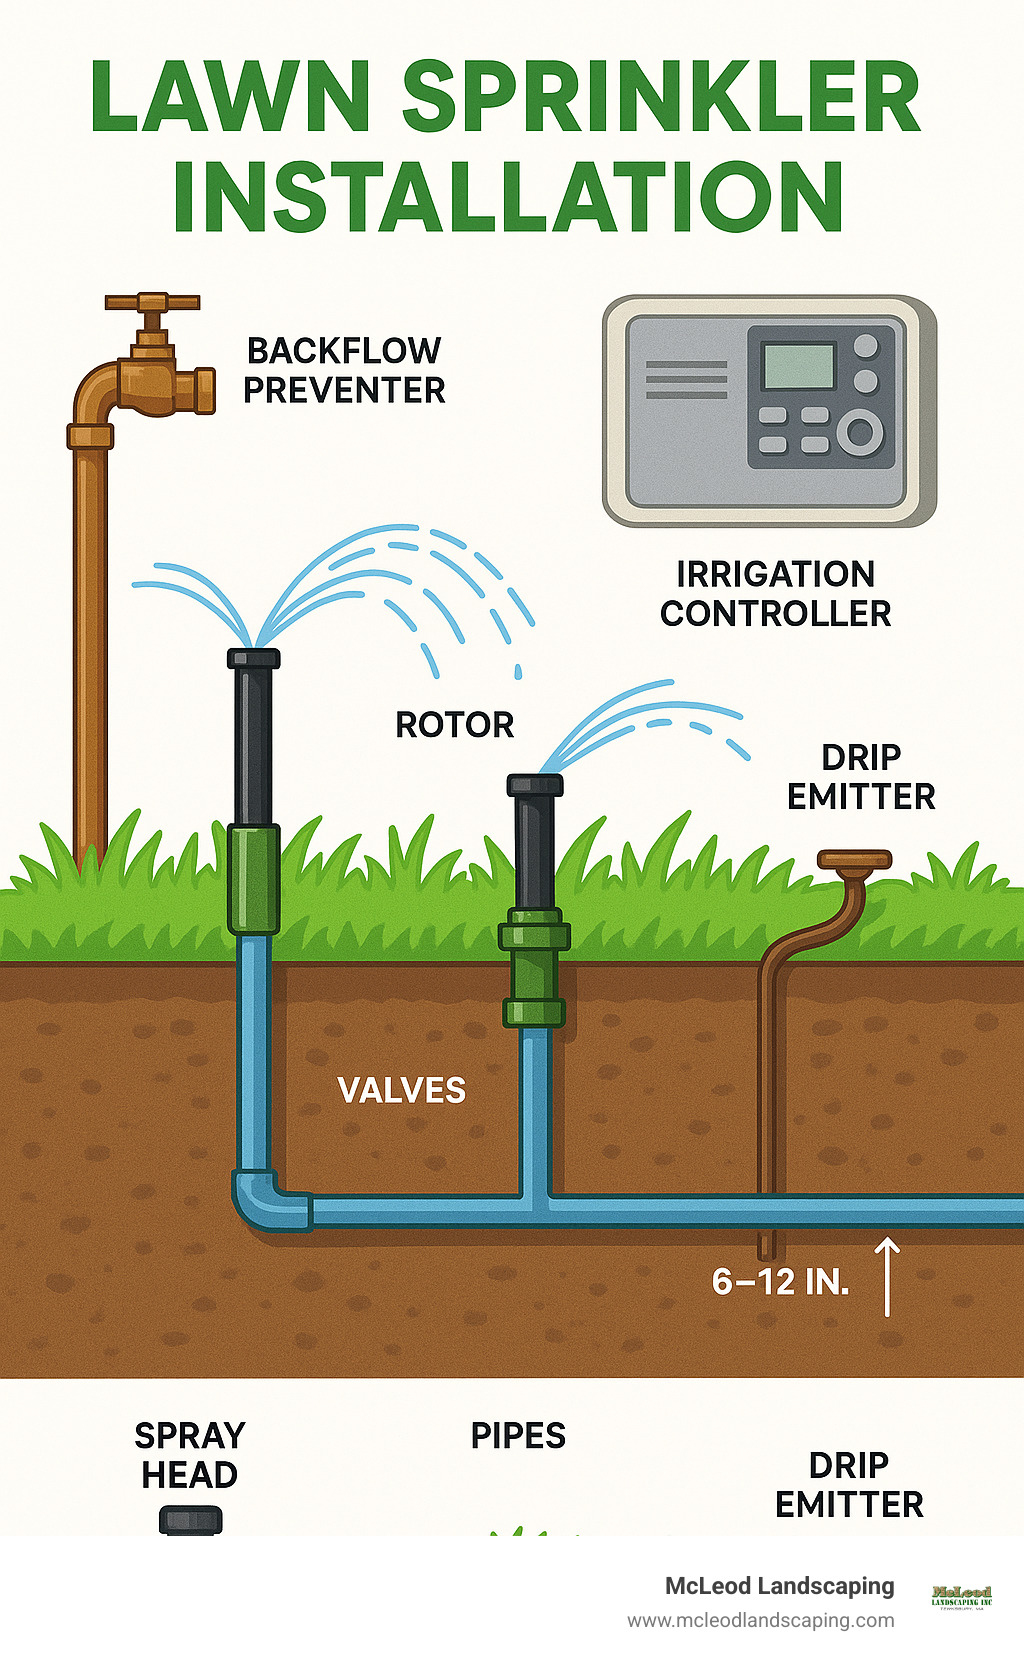
The pipes you choose are the hidden backbone of your system, and you’ve got two main options:
PVC Pipe is the rigid, stalwart option. It’s more durable and ideal for warmer climates. Installation requires primer and cement for connections, and it comes in different wall thicknesses (called “schedules”). While sturdy, it’s less forgiving in freezing conditions.
Polyethylene (Poly) Pipe is the flexible friend for our Massachusetts climate. It has more give to handle freeze-thaw cycles and uses simple clamp fittings rather than cement. If your yard has curves or obstacles, poly pipe can steer them more easily.
Think of the valve manifold as the command center of your irrigation system. It houses the valves that control water flow to each zone. For easier maintenance, we recommend grouping all valves together in one manifold assembly, placing it somewhere accessible—you’ll thank yourself later when adjustments are needed.
Your controller options range from simple timers to smart systems that would make a tech enthusiast smile. When planning your lawn sprinkler installation, consider:
A well-designed irrigation system is truly an investment in your landscape’s health and beauty, saving you time, water, and the frustration of uneven growth or dry patches. And if you’d like to learn more about the possibilities, check out our guide to Automatic Underground Lawn Sprinklers.
Rolling up your sleeves for a DIY lawn sprinkler installation can be a rewarding weekend project that saves you money while delivering professional results. While it’s definitely a workout (I won’t sugarcoat that part!), with careful planning and the right approach, most homeowners can successfully install their own system.
I can’t stress this enough – before you pick up that shovel, call 811 to have your underground utilities marked. This free service is absolutely essential to avoid what could be a dangerous (and expensive) mistake. Trust me, hitting a gas line or electrical cable is not how you want to remember your irrigation project! Allow at least 72 hours for the utility companies to come out and mark your property.
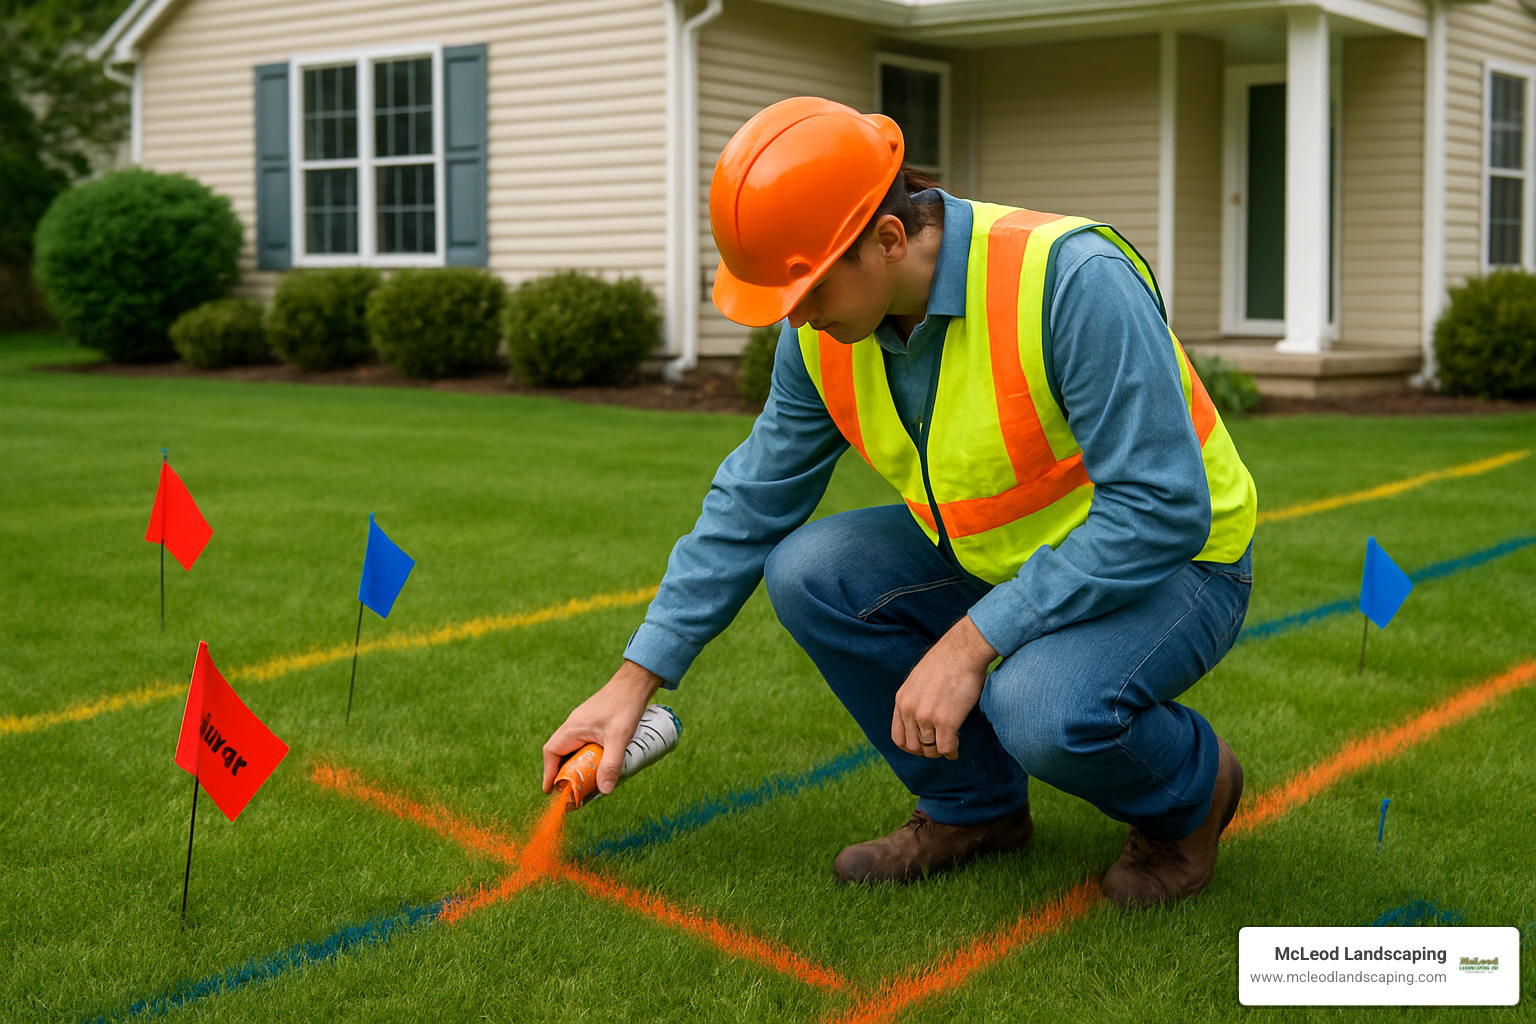
Consider this your irrigation blueprint on the ground. Use brightly colored stakes or flags to mark exactly where your sprinkler heads, valve manifold, and main lines will go. This visual guide is invaluable when you’re in the trenches (literally) and need to maintain proper spacing. Take your time here – a well-marked layout prevents headaches later.
Now comes the real workout! Your trenches should be 6-12 inches deep, depending on your local climate. Here in Massachusetts, we recommend digging at least 8-10 inches deep to keep your pipes safely below the frost line.
You’ve got options for this step: a manual trenching shovel works fine for smaller yards (and builds character!), while renting a power trencher for about $150-$200 per day might save your back for larger projects. If you’re using poly pipe, consider a pipe-pulling machine that creates less lawn disruption.
This is where your system connects to your home’s water supply – a critical junction that demands careful attention:
“I’ve seen DIYers try to skip the backflow preventer to save money,” shares our plumbing specialist, “but this isn’t just about following code – it’s about keeping your family’s drinking water safe from contamination.” This is definitely not the place to cut corners!
Think of your valve manifold as the command center of your irrigation system. Dig a hole about 18 inches deep and 2-3 feet long for your valve box, then add a layer of gravel at the bottom for drainage. Assemble your manifold with a valve for each zone, leaving enough elbow room between valves for future maintenance. Connect this assembly to your water supply line, and you’re ready for the next step.
With your trenches dug, it’s time to lay out your pipes according to your design. If you’re using PVC, I recommend measuring, cutting, and dry-fitting all pipes before applying primer and cement. For poly pipe, simply unroll along your trenches and cut to appropriate lengths. Don’t forget to install tees and elbows at your sprinkler head locations, and use flexible pipe or swing joints at each head for easier adjustment later.
Now you’ll connect your main lines to the valve manifold and your zone lines to their respective valves. Before making these final connections permanent, flush the entire system:
Turn on the water with the pipe ends open and let it run until the water flows clear. This simple step prevents debris from clogging your sprinkler heads and saves you from having to troubleshoot later.
After your system is properly flushed, it’s time to install the sprinkler heads at each marked location. Make sure they’re level with the ground surface (you don’t want to damage them with the lawnmower later). If you’re installing heads on slopes, tilt them so they’re perpendicular to the slope for even coverage. The flexible pipe connections you installed earlier will make fine-tuning their position much easier.
Mount your controller in a convenient, protected location, then run low-voltage wires from the controller to your valve box. Connect these wires to each valve solenoid, using waterproof wire connectors for all connections (regular wire nuts won’t cut it outdoors). Finally, program your controller according to the manufacturer’s instructions, setting up appropriate watering schedules for each zone.
The moment of truth! Run each zone separately and watch carefully for any leaks at your connections. This is also the time to adjust your sprinkler head spray patterns and distance to ensure proper coverage with no dry spots or wasteful overlap. Make final adjustments to your controller’s watering schedule based on your observations during this test run.

A DIY lawn sprinkler installation is definitely within reach for handy homeowners, but if you find yourself overwhelmed at any point, don’t hesitate to reach out to professionals. At McLeod Landscaping, we’ve seen plenty of half-finished DIY projects that needed rescue, and we’re always happy to help! For more detailed guidance, check out our comprehensive guide on How to Install a Sprinkler System.
Like any investment in your home, your lawn sprinkler installation requires regular attention to deliver years of reliable service. With proper care, your irrigation system can last 15-20 years or even longer, keeping your lawn lush while saving water and money.
As Massachusetts thaws from winter, your irrigation system needs some TLC before the growing season kicks into high gear. Think of it as waking your system from hibernation!
“The first activation of spring is when we catch most potential problems,” says our service team leader at McLeod Landscaping. “A thorough inspection now can prevent headaches during the hot summer months.”
Your spring checklist should include examining pipes and heads for winter damage, cleaning out any debris that’s accumulated in the sprinkler heads, and carefully checking for leaks when you first turn on the water. Don’t forget to adjust any sprinkler heads that may have shifted during freeze-thaw cycles, and update your controller programming to match spring conditions.

Even the best systems eventually need some repairs. The good news? Many common issues are straightforward fixes that won’t break the bank.
Replacing broken sprinkler heads is perhaps the most common repair, with replacement heads costing between $2-$30 each (plus labor if you hire a pro). Leaking valves typically run $20-$40 per valve to replace, while broken pipes might cost $5-$20 per foot to repair. For trickier electrical troubleshooting, expect to pay around $50-$100 per hour for professional help.
Most repair calls for residential systems fall in the $50-$800 range, depending on complexity. The most expensive repairs usually involve replacing major components like controllers or backflow preventers, or repairing multiple underground leaks.
Note: These are average costs based on internet data and not actual costs for McLeod Landscaping repair services.
If there’s one maintenance task you shouldn’t skip in our New England climate, it’s proper winterization. A single freeze can transform your irrigation system into a network of cracked pipes and damaged components.
“I’ve seen thousands of dollars in damage from improperly winterized systems,” our service manager explains. “The repair costs far exceed what you’d spend on annual winterization service.”
Proper winterization involves shutting down your controller (either turning it off or setting it to “rain” or “winter” mode), closing the main shut-off valve to your irrigation system, and most importantly, removing all water from the pipes and components using compressed air. Don’t forget to insulate any above-ground components like backflow preventers and exposed pipes.
Professional winterization service typically costs between $60 and $120 annually—a small investment compared to potential repair costs. At McLeod Landscaping, we recommend scheduling your winterization in early October before the first hard freeze hits our region.
The most impactful upgrade you can make to your existing lawn sprinkler installation is adding a smart controller. These intelligent devices have transformed irrigation efficiency by taking the guesswork out of watering schedules.
Unlike traditional timers that run regardless of weather conditions, smart controllers adjust watering based on real-time weather data, soil moisture levels, and plant needs. Many can be controlled via smartphone apps, allowing you to manage your irrigation system from anywhere.
The water savings are impressive. According to EPA data, replacing a standard timer with a smart controller saves the average household approximately 7,600 gallons of water annually. For many homeowners, these devices pay for themselves within the first year through reduced water bills.
Beyond smart controllers, consider adding rain sensors that automatically skip watering when nature provides moisture, soil moisture sensors that ensure you’re only watering when the soil actually needs it, and flow sensors that can detect leaks and automatically shut down your system to prevent water waste.
“Smart irrigation technology is no longer a luxury—it’s becoming standard practice for responsible homeowners,” notes our irrigation specialist. “The water savings alone make these upgrades worthwhile, not to mention the convenience of having a system that essentially manages itself.”
Looking to maintain or upgrade your existing system? Learn more about how to Fix Lawn Sprinkler System issues or explore our full range of irrigation sprinkler services.
Figuring out the right number of zones for your yard isn’t just about aesthetics—it’s about making sure your system actually works properly. The number of zones you’ll need depends on three main factors.
First, consider your yard size. Larger properties naturally require more zones to ensure complete coverage. Next, look at your water pressure and flow rate. This is crucial because your home’s available GPM (gallons per minute) determines how many sprinkler heads can operate at the same time without losing pressure. Finally, think about your landscape diversity—those beautiful flower beds need different watering than your lawn, and those mature trees have different requirements than your vegetable garden.
For a quick rule of thumb, small yards up to 1/4 acre typically need 2-4 zones, medium yards between 1/4 and 1/2 acre usually require 4-6 zones, and larger properties over 1/2 acre generally need 6 or more zones.
“Don’t try to squeeze too many heads into one zone,” advises our irrigation designer with a knowing smile. “This is a common mistake that results in poor performance. It’s better to add an extra zone than to have insufficient pressure. Trust me, I’ve seen the disappointing results!”
You absolutely can—and the savings are more substantial than most homeowners realize. Smart controllers typically reduce irrigation water usage by 30-50% compared to traditional timers. For the average household, this translates to meaningful benefits in several ways.
From a financial perspective, you’re looking at water savings of more than 7,000 gallons annually, which means approximately $430 staying in your pocket each year. Beyond the money, there’s the environmental impact of reduced water waste and runoff, which benefits your local ecosystem and community.
Most quality smart controllers cost between $150 and $300, meaning they typically pay for themselves in less than a year—a rare home improvement with such rapid return on investment. As an added bonus, many water districts offer rebates for installing WaterSense-certified smart controllers, making the deal even sweeter.
Here in Massachusetts, proper winterization isn’t optional—it’s essential for protecting your investment. When temperatures plummet below freezing, any water left in your lawn sprinkler installation can expand and crack pipes, damage valves, and destroy sprinkler heads.
The winterization process involves four critical steps. First, you’ll need to shut down the system completely by turning off both the controller and water supply. Next comes the most technical part—removing all water from the pipes. This is typically done using compressed air at 40-80 PSI to blow out every drop of water. You’ll also need to protect any above-ground components by insulating backflow preventers and exposed pipes. Finally, don’t forget to drain the manifold by opening all drain valves to release any trapped water.
While some dedicated DIYers choose to winterize their systems themselves, we strongly recommend professional service. The specialized compressed air equipment used by professionals can more thoroughly clear the system than manual methods, providing peace of mind throughout our harsh New England winters.
Think of it this way: professional winterization typically costs between $60 and $120 annually—a small price compared to potentially thousands in repair costs from freeze damage. As we often tell our clients, “You can pay a little now, or a lot later!”
A properly installed and maintained sprinkler system is truly an investment that keeps on giving—saving you precious time, conserving water, and enhancing the beauty of your landscape. While lawn sprinkler installation might seem daunting at first, I can tell you from experience that the results are absolutely worth every bit of planning and effort you put in.
Here at McLeod Landscaping, we’ve spent more than three decades helping homeowners and businesses throughout the Merrimack Valley create beautiful, sustainable landscapes that thrive year after year. We’ve seen how a well-designed irrigation system transforms not just lawns, but lives—giving homeowners back their weekends and providing peace of mind during hot summer months.
Think of your irrigation system as your landscape’s personal assistant, delivering just the right amount of moisture exactly when and where it’s needed. This precision doesn’t just make your grass greener—it promotes deeper root growth, reduces wasteful runoff, and can significantly boost your property’s curb appeal and value.
Whether you’re a dedicated DIYer ready to tackle the project yourself or you’d prefer to leave it to the professionals, we’re here to support you every step of the way with honest advice, quality materials, and reliable service that stands the test of time.
Ready to transform your landscape with an efficient, automated irrigation system that works as hard as you do? Contact McLeod Landscaping today and let’s create the lush, healthy landscape you’ve been dreaming of. Our team proudly serves Andover, Billerica, Burlington, Carlisle, Chelmsford, Concord, Lowell, Tewksbury, Westford, Wilmington, and surrounding areas with irrigation solutions custom to your specific needs.
Your grass will thank you—and when you see how much water you’re saving, your wallet will too!
Contact McLeod Landscaping today at (978) 640-0957 or click here to schedule a consultation for retaining wall installation. Let our experienced team design and install a functional and visually appealing retaining wall that enhances your landscape.

1881 Main St Unit 1, Tewksbury, MA 01876