What Makes Interlocking Pavers the Smart Choice for Your Walkway
An interlocking paver walkway is a modular paving system where individual concrete, brick, or stone units lock together through carefully engineered shapes and sand-filled joints—no mortar required. Here’s what makes them different from poured concrete:
Modular Design – Individual pavers can be replaced if damaged, unlike cracked concrete
Flexible System – Pavers shift with ground movement instead of cracking
Sand Joints – Allow for drainage and create the interlocking effect
Easy Repairs – Remove and replace damaged pavers without repaving the entire walkway
Design Versatility – Unlimited patterns, colors, and material combinations
These durable pathways can last up to 50 years when properly installed, with the foundation being the most critical factor for longevity. Based on internet data (not actual McLeod Landscaping pricing), expect material and installation costs ranging from $1,500 to $12,000+ depending on size, materials, and complexity.
I’m Scott McLeod, and over the past 30+ years at McLeod Landscaping, I’ve designed and installed countless interlocking paver walkways for both residential and commercial properties throughout the Merrimack Valley. Whether you’re a property manager seeking low-maintenance hardscaping or a homeowner wanting to improve your curb appeal, understanding the layers beneath those beautiful pavers is key to a walkway that performs for decades.
Designing Your Dream Walkway: Materials, Styles, and Patterns
Choosing an interlocking paver walkway for your property is more than just selecting a path; it’s about crafting an integral part of your landscape that improves both aesthetics and functionality. We believe that outdoor surfaces should be much more than just a solid surface to walk on; they should reflect your property’s personality and withstand the unique climate challenges of the Merrimack Valley.
Interlocking pavers are incredibly durable and offer far greater value in terms of life expectancy and curb appeal compared to traditional poured concrete. A well-designed paver walkway can give your property a significant facelift, creating a “wow” factor that makes your backyard the talk of the neighborhood. Plus, if a paver is ever damaged, it’s easy to pull out and replace, unlike a cracked concrete slab.
When we approach a walkway design, we consider several key factors:
Walkway Width: For comfortable passage, a standard walkway is typically 36 inches wide. If you envision two people walking side-by-side, we recommend 48 inches. For accessibility, a wheelchair-friendly path needs to be at least 36 inches wide, with a 60-inch turnaround area.
Path Style: Do you prefer a straight, formal approach, or a meandering, curved path that invites exploration through your garden? We can design both, ensuring that the walkway guides visitors gracefully through your outdoor space.
Purpose: Is this a main pathway to your front door, a functional connection between a patio and a pool, or a charming garden path? The purpose often dictates the material and design choices.
The aesthetic versatility of interlocking pavers is truly boundless. They offer unparalleled variety in shapes, colors, and sizes, allowing us to create unique patterns and color mixes that complement your home’s architecture and landscaping. We take pride in helping our clients throughout Andover, Billerica, Burlington, and beyond select patterns, textures, and colors that improve the character of their outdoor spaces. For more information on how we can transform your outdoor areas, check out our hardscaping services.
Exploring Materials for Your Interlocking Paver Walkway
The beauty of an interlocking paver walkway lies in the vast array of materials available, each offering distinct characteristics and aesthetic appeals. Here are some of the popular choices we work with:
Concrete Pavers: These are often the most affordable and versatile option. Concrete pavers come in an incredible range of shapes, sizes, and colors, making them suitable for almost any design vision. They are a practical choice that doesn’t compromise on style.
Brick Pavers: For a classic, charming, and traditional look, brick pavers are an excellent choice. Their reddish hues evoke a timeless appeal, and for an eco-friendly option with weathered charm, we can even use recycled brick pavers.
Natural Stone Pavers: These bring an undeniable elegance and organic feel to any walkway.
Bluestone: Known for its natural blue coloration, bluestone creates a sophisticated visual effect. As a natural product, it’s a more expensive option, but its enduring beauty is well worth the investment.
Marble: For stunning elegance and a luxurious appearance, marble pavers are available in various colors and finishes. While they can instantly increase home value, they are a more expensive option and require regular sealing to maintain their luster and prevent slipperiness.
Terracotta: If you’re aiming for a warm, Mediterranean feel, terracotta pavers can be used alone or combined with other materials for a unique look.
Shellstone: For a coastal or ocean-inspired vibe, shellstone pavers are a unique blend of seashells and paver material.
Split-face Pavers: These offer a rustic appearance with a rough, uneven texture, resembling natural stone. While not ideal for smooth walkways, they provide excellent slip resistance when wet.
Onyx Pavers: To add a splash of color and luxury, onyx pavers come in breathtaking shades like white, green, red, and blue. Depending on the finish, they can even be slightly translucent, giving them a glowing effect—a truly high-end choice.
Wood-Look Pavers: If you love the aesthetic of wood boards but want the durability of a solid paver surface, wood-look pavers are a fantastic choice that offers a unique visual appeal.
Quartzite Pavers: These natural stone pavers are known for their wear resistance, low maintenance, and can be a more affordable natural stone option.
Permeable Pavers: These innovative pavers are designed to allow water to seep through, reducing runoff and preventing puddles. This is especially beneficial in snowy climates like ours in Massachusetts, as they drain better, which often prevents ice from forming and makes clearing snow much easier.
We can help you explore locally sourced stone options that not only look fantastic but also perform exceptionally well in our climate.
Creative Styles and Patterns
Beyond the material itself, the way pavers are laid can dramatically alter the appearance of your interlocking paver walkway. We love experimenting with different styles and patterns to create truly unique designs for our clients in Chelmsford, Concord, and Lowell:
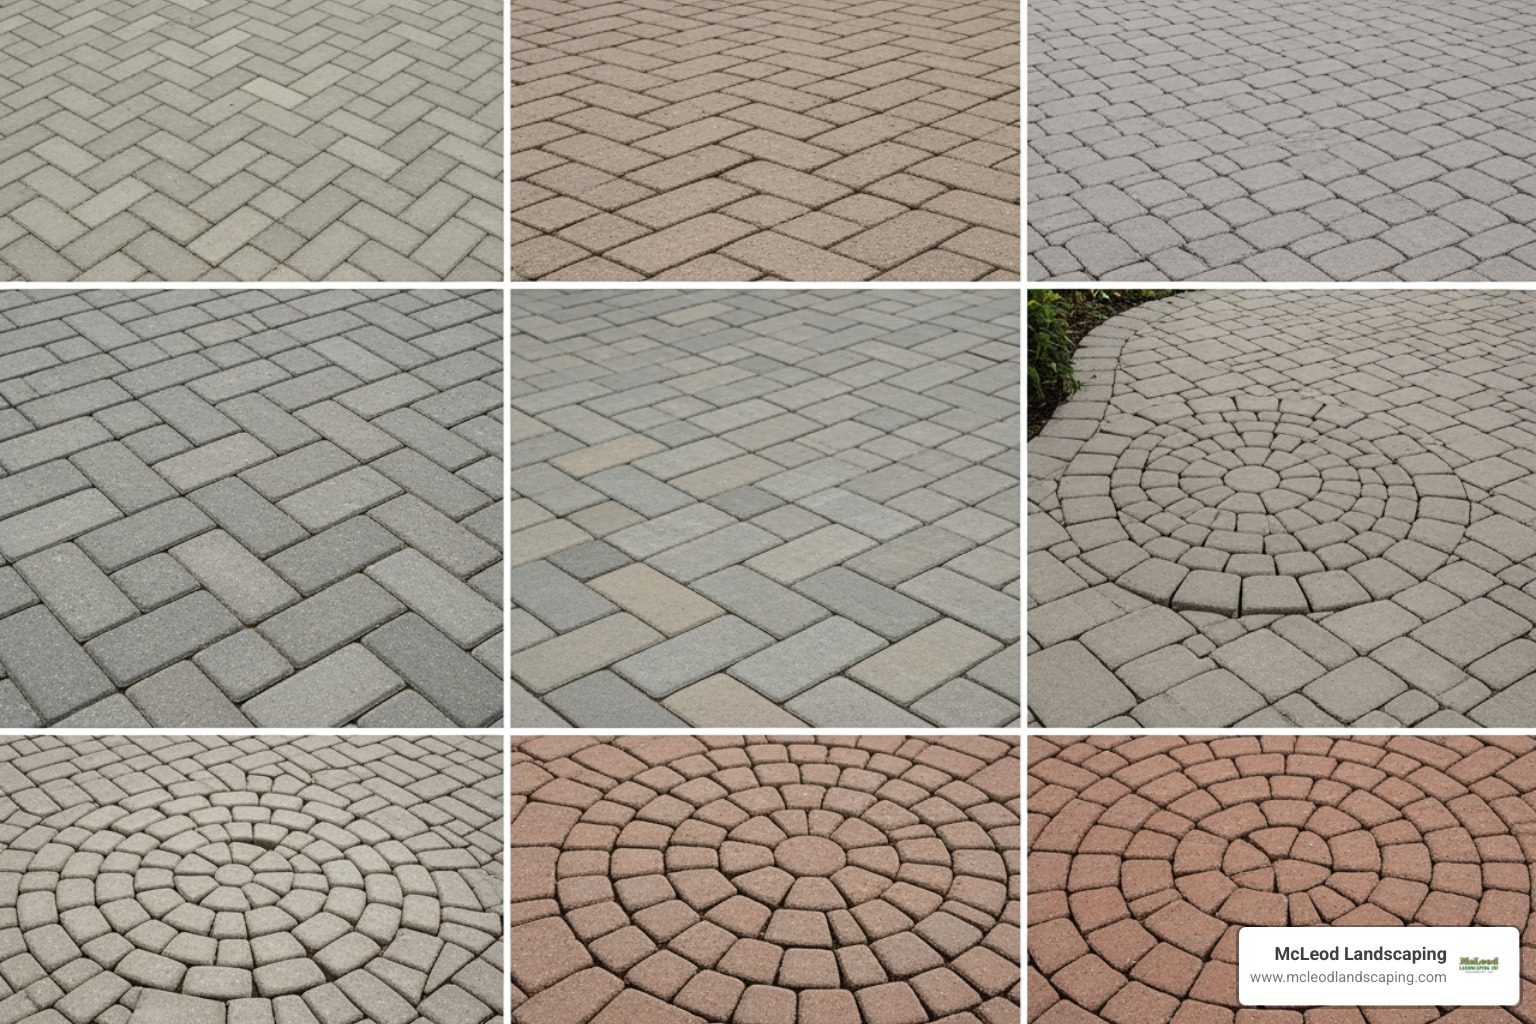
Classic Patterns: The herringbone pattern, running bond, and basketweave are timeless choices that offer structural integrity and visual appeal.
Blended Color Patterns: By mixing multiple sizes and colors of pavers, we can create a complex, puzzle-like appearance that adds depth and interest. This allows for geometric designs that fit together seamlessly.
Combining Pavers with Decorative Gravel: For a more informal and textured look, we often combine pavers with pea gravel. Using wider pavers like flagstone or slate and spacing them further apart creates room to place pea gravel around them. To keep the gravel firm and prevent it from spreading, we might use a water-permeable GFTK Xtreme Joint Compound.
Mosaic-Inspired Designs: For a true work of art underfoot, mosaic pavers can bring elegance and a splash of color, changing your walkway into a stunning focal point.
Custom Inlays: We can incorporate custom inlays or borders using contrasting paver types or colors to define sections, add visual interest, or highlight specific areas of your landscape.
No matter your vision, we can help you bring it to life. View our project gallery for inspiration and see the diverse range of interlocking paver walkways we’ve created.
Your Guide to a Flawless Interlocking Paver Walkway Installation
Installing an interlocking paver walkway is a challenging but incredibly rewarding project that can beautify your home for decades. While some homeowners opt for a DIY approach, especially for smaller projects, we often recommend professional installation for complex designs, larger areas, or if you’re not entirely confident in your ability to handle the physical demands and technical details.
DIY vs. Professional Installation:
Skill Level: Installing pavers is considered a challenging DIY project, often taking around three days for a basic walkway. Smaller manufactured pavers (8″ x 8″ or smaller) are generally the easiest to handle if you’re going it alone. Natural stone pavers, while beautiful, are heavier and more difficult to install.
Time Commitment: While tutorials often make it seem like a weekend project, proper installation requires significant time for preparation, laying, and finishing.
When to Hire a Pro: If your project involves intricate cuts, a complex design, a sloped area, or if you prefer to save your back and ensure a flawless, long-lasting result, hiring a professional like us is a smart investment. We have the specialized tools, experience, and crew to handle projects of any scale.
Safety Precautions: Whether DIY or professional, safety is paramount. Always wear safety goggles, hearing protection, gloves, and kneepads, especially when cutting pavers or using compacting equipment.
Key Steps for a DIY Interlocking Paver Walkway
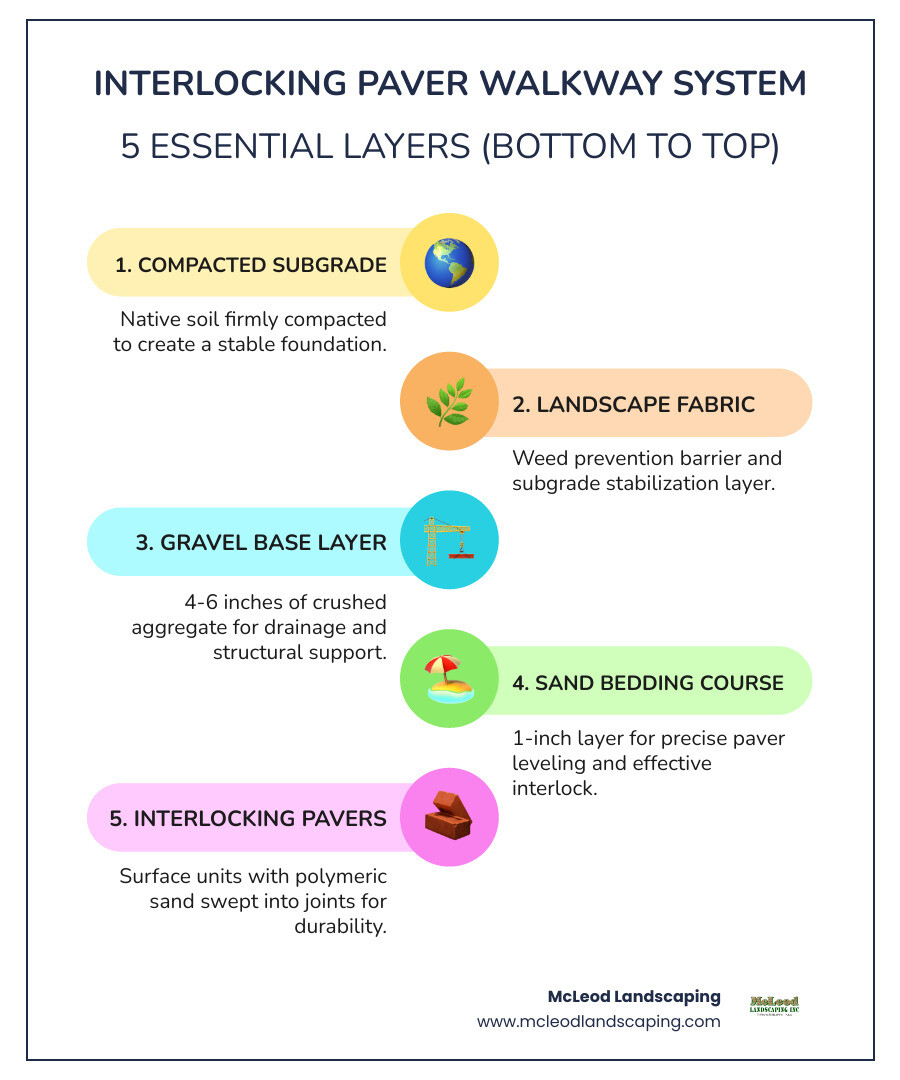
If you’re considering a DIY interlocking paver walkway, here’s a breakdown of the critical steps. A solid foundation is the secret to a long-lasting walkway!
Step 1: Excavation and Base Prep
Layout: Begin by laying out the area for your walkway using stakes and string. For perfect 90-degree corners, we recommend using the “3-4-5 triangle” method. If your walkway needs to slope for drainage, ensure a planned drop of about 1/4 inch per foot, directing water away from your home.
Digging the Base: This is where the foundation for longevity is laid. For a typical walkway, we dig a base of at least six inches deep. For best results, we aim for nine inches, with 4-6 inches of stone as the base layer. For driveways, a 12-inch base is recommended. It’s crucial to call 811 before digging to avoid underground utilities.
Weed Prevention with Landscape Fabric: After excavation, we lay down permeable landscape fabric. This acts as a barrier, separating the stone base from the soil, stabilizing the subgrade, and significantly mitigating weed growth.
Adding and Compacting Gravel Base: Next, we add a layer of coarse material, preferably #5 (1”) stone gravel, and compact it thoroughly with a plate compactor or hand tamper. This creates a firm, stable base. For heavier use, this gravel base can be 4-6 inches deep for walkways. After the coarse layer, a finer substance like ⅜” stone is added and tamped again. Proper compaction in lifts is essential to prevent future settling and ensure a level surface.
Laying the Pavers and Finishing Touches
Once the base is carefully prepared, we move on to the exciting part – laying the pavers!
Step 2: Sand Bed and Edging
1-inch Sand Layer: Over the compacted gravel base, we spread a uniform 1-1.5 inch layer of moist washed concrete sand. This “bedding course” provides a level surface for the pavers. We often use PVC pipes as guides to screed and level this sand layer precisely, ensuring a consistent thickness.
Installing Edge Restraints: Before laying the main pavers, we install edging around the perimeter of the walkway. This can be flexible plastic or concrete/paver stones. Edge restraints are vital for containing the sand and pavers, preventing them from shifting or spreading over time. For curved walkways, we use flexible plastic edging, often cutting every second or third rib to allow it to flex around the curves.
Step 3: Laying Pavers and Finishing
Laying Pavers: We start laying the interlocking paver stones from a true corner, working outwards. Using the “click-and-drop” method helps avoid disturbing the sand bed. We ensure close contact between pavers, leaving a small gap (e.g., 1/4 inch) for the jointing sand. It’s important to keep the height difference (lippage) between adjacent pavers to a maximum of 1/8 inch (3 millimeters) to prevent trip hazards and ensure proper drainage.
Cutting Pavers for Curves: For intricate designs or curved sections, pavers need to be cut. We use a masonry saw for precise cuts, always wearing protective gear. For simpler cuts, a hammer and chisel can suffice. For curves, we might mark the curve using a PVC conduit, score the line with a demo saw, and then make the final cut with a masonry saw.
Final Compaction: Once all pavers are laid, we compact the entire surface with a vibratory plate compactor. This helps settle the pavers into the sand bed and interlocks them structurally. For textured pavers, we use a protection mat during compaction to prevent scuffing.
Sweeping Polymeric Sand into Joints: The final step involves sweeping polymeric sand over the surface and into all the joints between the pavers. Polymeric sand contains additives that create a strong bond when wet, helping to lock the pavers in place, deter weed growth, and stabilize the walkway. We ensure all excess sand is thoroughly removed with a leaf blower before lightly spraying the walkway with water, as any leftover sand can create a permanent white haze. After a light spray, the walkway needs to cure for about 24 hours. Alternatively, a jointing resin compound can be used, which hardens when exposed to moisture, creating a strong barrier against weeds and providing stability.
Long-Term Value: Cost, Maintenance, and Weather Resilience
An interlocking paver walkway is an investment that pays dividends in durability, aesthetics, and functionality for decades. While the initial cost might be higher than some alternatives, the long-term value and minimal upkeep make it a smart choice for properties across Tewksbury, Westford, and Wilmington, MA.
Cost Considerations:
The average cost for interlocking pavers, including materials and professional installation, is about $3,400. However, this is just an average based on internet data and not actual McLeod Landscaping pricing. The total cost can vary significantly based on:
Material Choice: Concrete pavers are generally the most affordable, while natural stones like bluestone or onyx can be considerably more expensive.
Walkway Size and Complexity: Larger areas and intricate designs with many cuts or curves will naturally increase labor and material costs.
Site Conditions: Difficult terrain, extensive excavation, or drainage issues can add to the project’s complexity and cost.
Based on internet data, you should expect a wide price range for an interlocking paver walkway, from approximately $1,500 for a basic, smaller project to $12,000+ for larger, more complex installations using premium materials. While DIY can save 40-60% on labor, professional installation ensures the foundation is perfect, which is critical for the paver’s 50-year lifespan.
Maintenance and Weather Performance
One of the great advantages of an interlocking paver walkway is its relatively low maintenance and excellent performance in various weather conditions, especially in the challenging New England climate.
Routine Cleaning: Regular sweeping keeps your walkway looking fresh. For deeper cleaning, a pressure washer can be used carefully to avoid dislodging joint sand.
Weed Prevention: Weeds are persistent, but several strategies help. Building the foundation correctly with permeable landscape fabric and using crushed stone instead of sand in the base can deter them. Sweeping a jointing resin compound between pavers after installation creates a strong barrier. For ongoing prevention, simple home remedies like occasional applications of baking soda, vinegar, or dish soap diluted in water can be effective.
Sealing Pavers: Applying an optional sealer every 2-3 years protects your pavers from oil, tire marks, and other stains. It also helps stabilize the joint sand from washing out and improves the paver’s color. You can test if sealing is needed by seeing if water beads on the surface; if it soaks in, it’s time to reseal.
Handling Snow and Ice: Interlocking paver walkways perform exceptionally well in snowy conditions. Permeable pavers are particularly recommended for snowy climates due to their superior drainage, which often prevents water from puddling and freezing into ice. Their inherent texture also provides better grip. For larger properties, our commercial snow removal services ensure your walkways remain clear and safe throughout the winter.
Freeze-Thaw Resistance: High-quality concrete pavers are manufactured to withstand the freeze-thaw cycles common in Massachusetts, preventing cracking and deterioration that can plague other paving materials.
Common Challenges and Solutions
Even with the best installation, some challenges can arise with an interlocking paver walkway. Knowing how to address them ensures your walkway remains beautiful and functional.
Sinking or Settling Pavers: This is almost always due to an improperly prepared or compacted base. If you notice a section sinking, it means the foundation beneath it has shifted or settled. The solution involves carefully removing the affected pavers, re-excavating and re-compacting the base material, adding fresh sand, and then relaying the pavers. Ensuring all layers are level and thoroughly compacted during installation is key to prevention.
Weed Growth in Joints: Despite preventive measures, tenacious weeds can sometimes sprout. Regular maintenance, as discussed above (jointing compound, home remedies, good base prep), is the best defense. For existing weeds, manual removal or targeted weed killers (following product instructions) are effective.
Efflorescence (White Haze): This white powdery residue can appear on new pavers. It’s a natural phenomenon where mineral salts leach from the concrete and crystallize on the surface. It usually fades with time and exposure to weather. For faster removal, specialized efflorescence cleaners can be used. Crucially, when applying polymeric sand, ensure all excess sand is removed before wetting the surface to prevent a permanent white haze.
Lippage (Height Difference): The maximum allowable height difference (lippage) between interlocking pavers is 1/8 inch (3 millimeters). Any greater difference can be a tripping hazard and hinder proper water drainage. If lippage occurs, it often points to an uneven sand bed during installation. Correcting this involves lifting the pavers, adjusting the sand bed, and relaying to achieve an even surface.
Frequently Asked Questions about Interlocking Paver Walkways
We often receive questions from homeowners and commercial property managers in the Merrimack Valley about interlocking paver walkways. Here are some of the most common ones:
How long do interlocking paver walkways last?
If installed correctly, an interlocking paver walkway can last an impressive 50 years or more. The longevity of your paver walkway hinges almost entirely on the quality of its foundation. Rushing the base preparation or skimping on materials will significantly shorten its lifespan. That’s why we emphasize meticulous excavation, proper base material, and thorough compaction – it’s the secret to a walkway that stands the test of time.
What is the best base for a paver walkway?
The best base for a paver walkway is a multi-layered system designed for stability and drainage. We typically recommend a base that is a minimum of six inches deep, with nine inches being ideal for most projects. This includes:
Compacted Subgrade: The native soil, properly graded and compacted.
Permeable Landscape Fabric: Laid over the subgrade to prevent mixing of materials and inhibit weeds.
Gravel Base: A 4-6 inch layer of coarse material, such as #5 (1”) stone gravel, thoroughly compacted. This provides the primary structural support and drainage. This layer may be topped with a finer ⅜” stone layer, also compacted.
Sand Bedding Course: A uniform 1-1.5 inch layer of washed concrete sand, precisely screeded to create a level surface for the pavers.
For driveways or areas with heavier traffic, the gravel base might need to be even deeper, up to 12 inches.
Can you lay pavers over an existing concrete walkway?
Yes, it is possible to lay pavers over an existing concrete walkway, but it requires careful consideration and professional assessment. This method, often called an overlay, can save on excavation costs. However, several factors must be evaluated:
Condition of Existing Concrete: The concrete must be structurally sound, with no major cracks, settling, or heaving. Any existing issues will transfer to the new paver surface.
Drainage: Adequate drainage must be ensured, as the added height of the pavers could alter water flow.
Height Clearance: The increased height of the new paver surface must not impede doors, steps, or other features.
Edge Restraint: Proper edge restraints are still necessary to contain the pavers.
While some DIYers might attempt this, we often recommend a professional assessment or even removal of the old concrete for optimal long-term performance, especially here in the Merrimack Valley where freeze-thaw cycles are common. An improperly installed overlay can lead to drainage problems, shifting pavers, and a shorter lifespan for your new walkway.
Conclusion: Lift Your Property with a Custom Walkway
An interlocking paver walkway offers an best combination of durability, beauty, and customization that truly lifts any property. From enhancing curb appeal and increasing property value to providing a long-lasting, low-maintenance pathway, the benefits are clear. Whether you envision a classic brick path, a modern concrete design, or a luxurious natural stone walkway, the versatility of pavers allows for endless creative possibilities.
At McLeod Landscaping, with over 30 years of experience, we pride ourselves on designing and installing exceptional residential and commercial hardscaping solutions throughout the Merrimack Valley, including Andover, Billerica, Burlington, Carlisle, Chelmsford, Concord, Lowell, Tewksbury, Westford, and Wilmington, MA. We understand the unique demands of our local climate and are experts in building foundations that ensure your interlocking paver walkway will perform beautifully for decades to come.
Contact McLeod Landscaping today at (978) 640-0957 or click here to schedule a consultation for retaining wall installation. Let our experienced team design and install a functional and visually appealing retaining wall that enhances your landscape.