
Building a paver patio with retaining wall is one of the most effective ways to turn a sloped, unusable backyard into a level, functional outdoor living space. Done right, it controls erosion, adds lasting beauty, and can increase your usable outdoor space by up to 50%.
Here’s a quick overview of the core steps:
This combination works because the retaining wall holds back the soil while the paver surface gives you a stable, flat area for seating, dining, or entertaining — even on challenging terrain.
Sloped yards aren’t just tricky to use. Without proper support, they’re also vulnerable to soil erosion, water runoff, and long-term landscape damage. A well-built retaining wall with an integrated paver patio solves all of that in one project.
I’m Scott McLeod, owner of McLeod Landscaping Inc. in Tewksbury, MA, with over 30 years of hands-on experience in hardscaping — including building a paver patio with retaining wall on all kinds of challenging New England terrain. In this guide, I’ll walk you through everything you need to know to plan and build this project the right way.
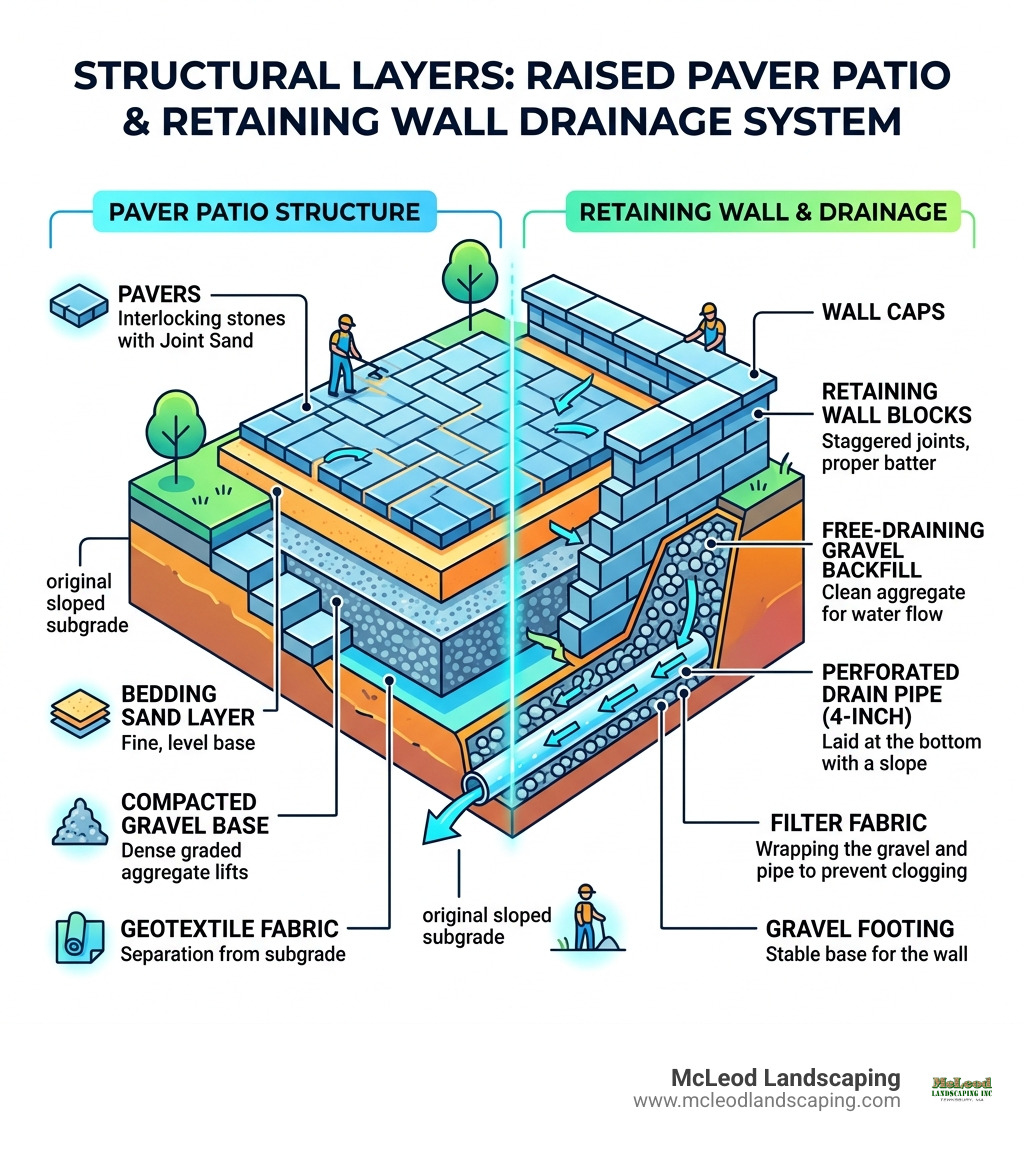
Simple guide to building a paver patio with retaining wall terms:
Before you pick up a shovel, you need a solid plan. In the Merrimack Valley, our soil can range from sandy to heavy clay, and our winters bring the dreaded freeze-thaw cycle. If you don’t plan for these factors, your beautiful new patio might look like a roller coaster after just one season.
Start with a site assessment. Walk your yard and look for where water naturally pools. When building a paver patio with retaining wall, the wall’s primary job is to hold back the weight of the earth, but its secondary job is managing water. You can explore various Retaining Wall Ideas to see how different heights and shapes can complement your home’s architecture.
To determine how high your wall needs to be, you must measure the slope. You can use a rotary laser level or a simple string line and line level. Stretch a string from the highest point of the proposed patio to the lowest, making sure the string is perfectly level. Measure the vertical distance from the string to the ground at the low end—this is your “rise,” which tells you how much soil the wall needs to retain.
Once you have your dimensions, use the 3-4-5 squaring method to ensure your patio corners are perfectly 90 degrees. Measure 3 feet along one side and 4 feet along the adjacent side; the diagonal between those two points should be exactly 5 feet. For a more technical deep dive, you can check out this How to Build a Paver Patio With a Retaining Wall – Engineer Fix guide.
Don’t skip the legalities. In many Massachusetts towns like Andover or Concord, a retaining wall over 3 or 4 feet high requires a building permit and often a structural engineer’s stamp. Always call 811 before you dig to have your underground utilities marked.
When calculating materials, remember the “waste factor.” For a standard square patio, order 10% extra pavers to account for cuts and breakage. If you’re designing a curved patio, bump that up to 20%. You’ll also need to calculate your base material: a good rule of thumb is (Square Footage x Depth in Inches x 0.003) to find the cubic yards of gravel needed.
To get a professional result, you’ll need professional-grade tools. While you can use a hand tamper for tiny garden borders, building a paver patio with retaining wall requires a gas-powered plate compactor to prevent settling.
Essential Checklist:
Budgeting for a “raised patio” (a patio held up by a wall) is more complex than a standard ground-level install. Based on internet data, the average cost for these projects is approximately $60 per square foot, though a wide range of prices exists from $25 to over $180 per square foot depending on site conditions and material choice.
Note: These are average costs based on internet data and are not actual costs for McLeod Landscaping. For a precise quote tailored to the Merrimack Valley, it’s best to consult a local professional.
When Building A Retaining Wall, don’t forget to budget for tool rentals and site preparation. Moving 20 tons of gravel by hand is a Herculean task; renting a skid-steer for a weekend can save your back and your timeline. For more details on pricing factors, see our guide on How Much Does A Retaining Wall Cost.

Now for the “fun” part: the digging. Once your utilities are marked, start excavating. For the retaining wall, you need a trench that is twice as wide as the block and deep enough to bury at least half of the first course of blocks plus 6 inches of gravel base.
For the patio area, you’ll typically excavate 7 to 13 inches deep. This allows for 6 inches of compacted gravel, 1 inch of bedding sand, and the thickness of the pavers themselves. If you have heavy clay soil—common in parts of Billerica and Lowell—you may need to dig deeper and add more base material to ensure stability during the winter.
The “subgrade” is the native soil at the bottom of your hole. Compact this soil thoroughly before adding any gravel. When you start adding your 3/4-inch crushed stone, do it in “lifts” of 2 to 3 inches at a time. Run the plate compactor over each lift multiple times. If you dump 6 inches of gravel in and only compact the top, the bottom will eventually settle, causing your patio to dip.
Proper drainage is non-negotiable. Your patio should have a 1/4-inch slope for every foot of length (a 2% grade) away from your house and the retaining wall. This ensures that heavy April rains don’t turn your new living space into a swimming pool. For more on the basics, check out our guide on Installing Patio Pavers.
Water is the “silent killer” of retaining walls. When water gets trapped behind a wall, it creates hydrostatic pressure—a heavy, pushing force that can eventually tip even the heaviest blocks. According to industry statistics, proper drainage can reduce soil pressure on a wall by up to 30%.
To prevent this, follow these three rules:
For taller walls, we often use geogrid—a high-strength mesh that sits between block layers and extends back into the soil to “tie” the wall to the earth. This is a critical step for structural integrity. You can find more technical advice in this Building a Retaining Wall for a Paver Patio: A Comprehensive Guide – MyGardenPlans.
The first course of blocks is the most important part of the entire project. If this row isn’t perfectly level, every row above it will be increasingly crooked. Spend as much time as necessary—even hours—getting this right. Use a rubber mallet to tap blocks into place on your compacted gravel base.
As you stack subsequent rows, stagger the joints (like a brick wall) so that the vertical seams don’t line up. This creates a much stronger structure. Most modern blocks have a built-in “batter” or setback, meaning the wall naturally leans slightly back into the slope as it gets higher. This lean helps the wall resist the weight of the soil.
For the top layer, install capstones. These should be secured using a high-quality masonry construction adhesive. A 1 to 1.5-inch overhang on the front of the wall provides a professional, finished look and helps shed water away from the face of the blocks. Learn more about the nuances of Retaining Wall Installation on our service page.
With the wall secure, it’s time to lay the patio. Spread a 1-inch layer of bedding sand over your compacted gravel base. Use two parallel pipes and a straight board (the “screeding” method) to create a perfectly smooth, sloped surface. Do not walk on the sand once it’s leveled!
Start laying your pavers from the longest straight edge, usually the house or the retaining wall. Whether you choose a herringbone, running bond, or pinwheel pattern, keep your lines straight by using a string line. If you need to cut pavers to fit against the wall, use a wet saw for the cleanest edges.
Once the pavers are down, sweep polymeric sand into the joints. This special sand contains binders that harden when misted with water, locking the pavers together and preventing ants and weeds from moving in. Run the plate compactor (with a protective mat) over the pavers one last time to settle them into the sand before the final misting.
Even the best DIYers can fall into common traps. The biggest mistake? Skipping compaction or using the wrong backfill. Using dirt instead of gravel behind a wall is a recipe for disaster in our New England climate. When that dirt freezes and expands, it will push your wall right over.
To keep your patio looking new for the next 50 years:
For more inspiration on how to finish your space, browse our The Ultimate Guide To Backyard Retaining Wall Landscaping And Design Ideas.
For most DIYers using “gravity walls” (walls that rely on their own weight), you should stay under 3 feet in height. Anything taller than 36–48 inches significantly increases soil pressure and usually requires professional engineering and specific local permits in towns like Tewksbury or Wilmington. Safety first—if you’re going high, call a Retaining Wall Contractor.
As mentioned, water pressure is the leading cause of wall failure. In the Merrimack Valley, we deal with heavy snowmelt and spring rains. If that water can’t escape through perforated pipes and gravel, it will freeze behind the wall, causing “frost heave.” Proper drainage can reduce this pressure by up to 30%, ensuring your wall doesn’t “blow out” during a thaw.
If your yard is very steep, one massive wall can be intimidating and structurally difficult. Instead, consider “tiering” the walls. Building two smaller 2-foot walls with a small planting bed in between is often more stable and visually appealing than one 4-foot wall. You can find more Backyard Retaining Wall Ideas on our blog to see how tiered systems look in practice.
Building a paver patio with retaining wall is a major undertaking, but the reward is a transformed backyard that adds value and usable space to your home. By following the right steps—meticulous planning, deep excavation, robust drainage, and careful installation—you can create an outdoor oasis that lasts for decades.
However, we know that not everyone has the time or the heavy equipment to tackle a project of this scale. At McLeod Landscaping, we’ve spent over 30 years perfecting the art of hardscaping in the Merrimack Valley. From Concord to Lowell, we help homeowners navigate the complexities of New England soil and climate to build stunning, durable outdoor spaces.
If you’re ready to elevate your backyard but want the peace of mind that comes with professional installation, we’re here to help. Check out our Patio Installation Services or contact us today to discuss your vision. Let’s build something beautiful together!
Contact McLeod Landscaping today at (978) 640-0957 or click here to schedule a consultation for retaining wall installation. Let our experienced team design and install a functional and visually appealing retaining wall that enhances your landscape.


1881 Main St Unit 1, Tewksbury, MA 01876