
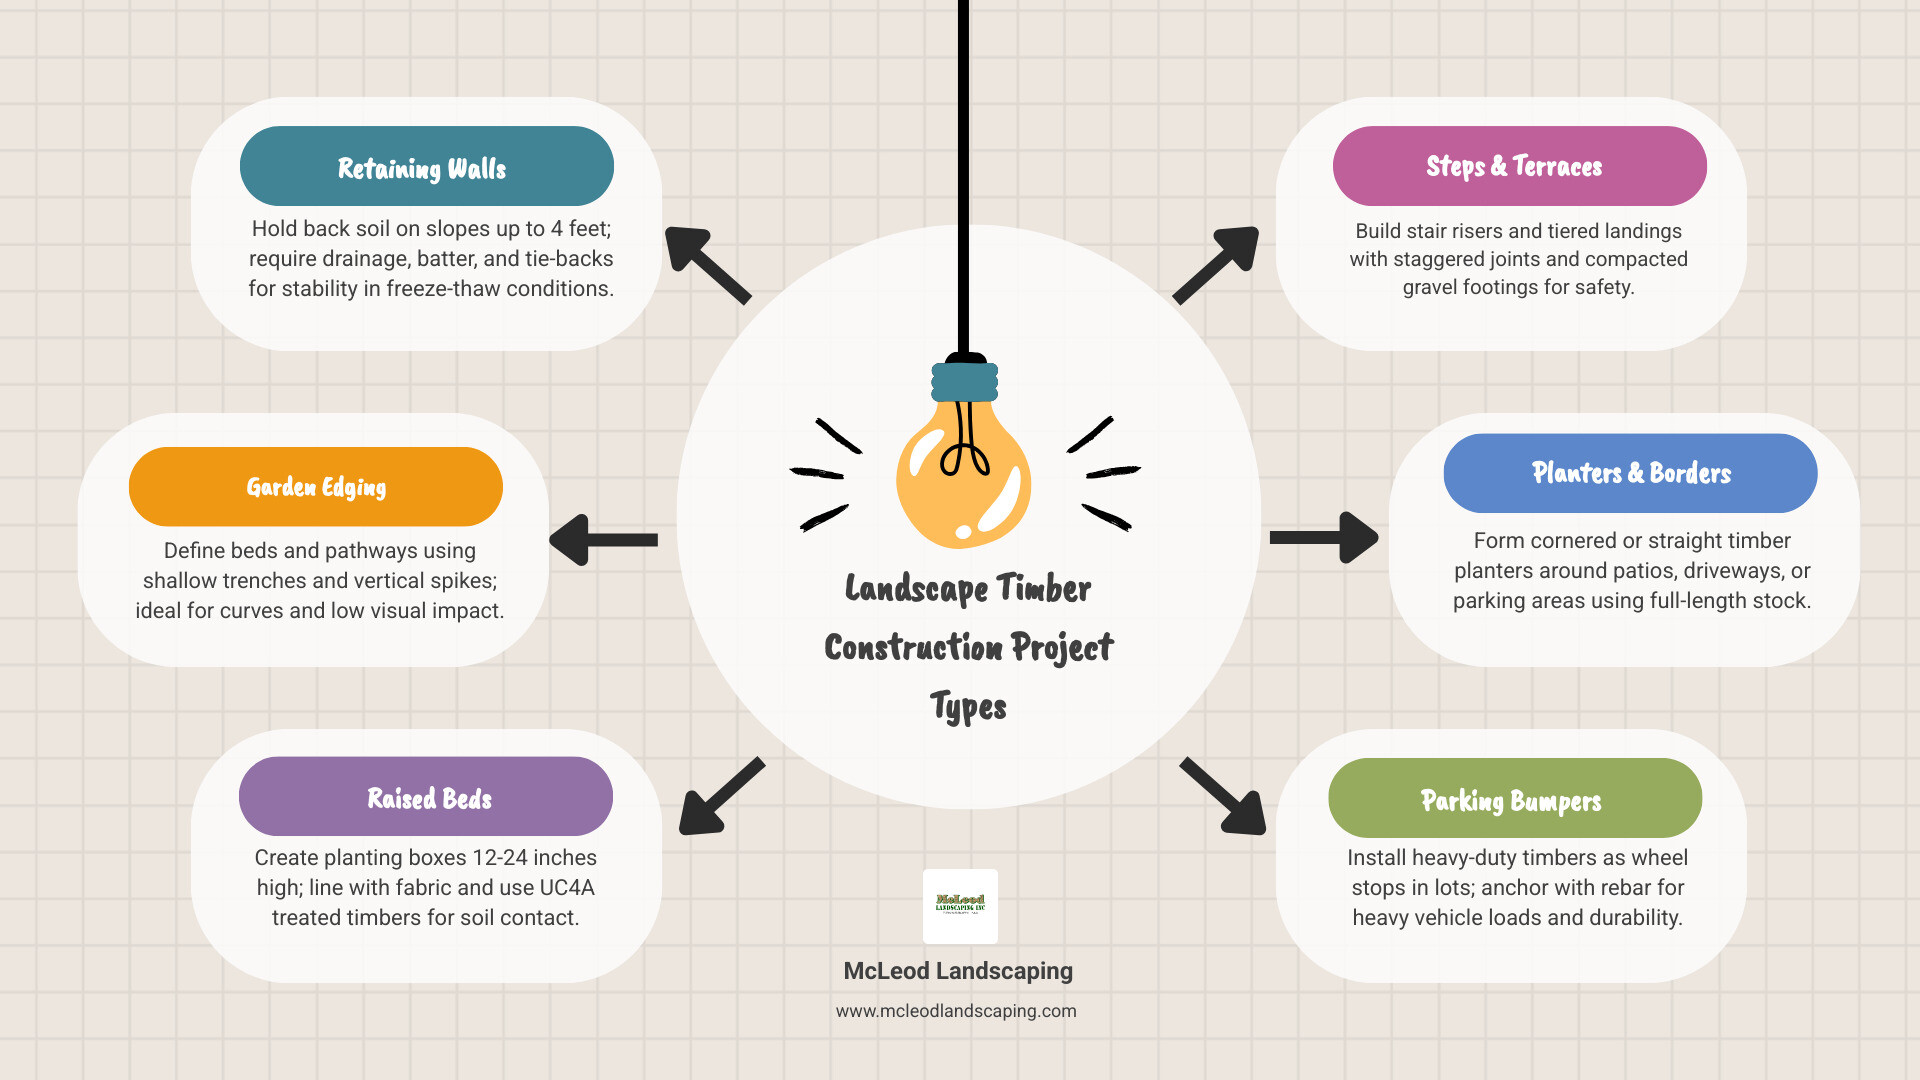
Landscape timber construction uses solid, treated wood members to build retaining walls, garden edging, raised beds, steps, and borders that hold back soil, define outdoor spaces, and add natural character to a yard or commercial property.
Here is a quick summary of what you need to know:
| Topic | Key Facts |
|---|---|
| What it is | Structural and decorative use of treated wood timbers in outdoor landscaping |
| Common uses | Retaining walls, edging, raised garden beds, steps, planters, parking bumpers |
| Best materials | Ground-contact pressure-treated lumber (UC4A or UC4B), cedar, black locust |
| Typical lifespan | 15 to 25 years with proper drainage and construction |
| Average project cost | Roughly $800 to $3,600+ for a basic retaining wall (internet pricing averages; not McLeod Landscaping pricing) |
| Vs. concrete block | About half the cost, but shorter lifespan |
| Height limit (DIY) | Generally 3 to 4 feet without professional engineering |
| Permit trigger | Many towns require permits for walls over 30 inches |
Landscape timbers are one of the most accessible and cost-effective materials for managing slopes, erosion, and garden structure — especially for projects under four feet in height. They are easier to cut, move, and install than stone or concrete, and they blend naturally into residential and commercial landscapes alike. The tradeoff is lifespan and maintenance: without proper drainage, fastening, and wood treatment, timber walls can fail far sooner than expected.
I’m Scott McLeod, owner of McLeod Landscaping Inc. in Tewksbury, MA, with over 30 years of hands-on experience in landscape timber construction and hardscaping across the Merrimack Valley. In that time, I’ve seen what separates a timber wall that lasts 25 years from one that leans and rots in five — and this guide covers all of it.
The success of any timber project starts with the material itself. Not all “landscape timbers” are equal. Some are full-dimension, pressure-treated structural pieces meant for ground contact. Others are lower-grade peeler-core products that may look fine on the rack but disappoint quickly once buried in wet soil.
For most projects in Tewksbury, Andover, Billerica, Burlington, Carlisle, Chelmsford, Concord, Lowell, Westford, Wilmington, and surrounding Merrimack Valley conditions, moisture and freeze-thaw cycles matter. A timber that handles burial, drainage swings, and insect exposure is worth the extra care in selection.
| Material | Cost | Lifespan | Best use | Main drawback |
|---|---|---|---|---|
| Landscape timbers | Lower | 15 to 25 years | Low retaining walls, edging, beds, steps | Rot risk if drainage is poor |
| Concrete block | Medium to high | Long | Taller walls, engineered systems | Higher cost and labor |
| Natural stone | High to very high | Very long | Premium walls and naturalistic designs | Expensive and labor-intensive |
| Railroad ties | Varies | Varies | Generally not recommended | Potential chemical concerns |
There are a few main categories we consider:
Pressure-treated timbers are the most common choice for retaining walls and edging because they are made for exterior use and resist rot, fungi, and insects better than untreated wood. For buried or ground-contact applications, look for a ground-contact rating such as UC4A or UC4B.
Untreated wood can work for decorative, above-grade uses, but it is usually a poor choice where the timber touches soil regularly. In New England weather, untreated pine in damp soil can break down fast.
Naturally rot-resistant woods like cedar and black locust can be good choices for certain applications, especially where you want to avoid standard treatment chemicals. That said, they are often more expensive and may be harder to source in the dimensions needed for structural landscape work.
Synthetic timbers, usually made with recycled plastic content, avoid rot entirely and can be useful for edging or non-structural applications. The tradeoff is that they do not always have the same stiffness, natural appearance, or fastening behavior as real wood.
You will also see rough-sawn and surfaced timbers. Rough-sawn looks more rustic. Surfaced timber has a cleaner, more finished appearance. Either can work if the treatment rating is right.
For structural landscape use, we favor these priorities:
Southern Yellow Pine is commonly used because it accepts preservative treatment well and offers solid strength. Cedar and black locust are strong natural alternatives in the right application, but they are less common for standard retaining wall builds in our area.
A few simple rules help:
One important safety note: pressure-treated landscape timber is for outdoor use. It should not be repurposed for indoor living spaces, and scraps should never be burned.
Landscape timbers shine in projects where a warm, natural look matters and the wall height stays modest.
They work especially well for:
They are less ideal for tall walls, heavy surcharge loads, or locations where you want a near-permanent, low-maintenance structure.

Material choice is really a balance of cost, look, expected lifespan, and structural demands.
The biggest advantages of timber are affordability and workability. Research consistently shows timber retaining walls often cost about half as much as comparable concrete block walls, especially for heights under four feet. Internet pricing averages also place a basic timber retaining wall in a wide range from $800 to $3,600 or more (note: these are internet averages and not actual costs for McLeod Landscaping), though more complex projects can climb much higher depending on site access, drainage work, demolition, and finish details.
Advantages include:
Disadvantages include:
If you want design inspiration, see our retaining wall ideas.
Concrete block and stone are usually better choices when you need:
In Merrimack Valley freeze-thaw conditions, properly built masonry systems generally outlast timber. They cost more up front, but the longer service life can make sense for permanent structural work.
For material comparisons, visit our page on retaining wall blocks.
Railroad ties get mentioned in almost every timber conversation, so let us settle that one gently but clearly: for most residential and light commercial landscape use, they are usually not the smart option.
Many older ties were treated with creosote, which raises concerns around soil contact, edible gardens, and play areas. They can also be messy, inconsistent in size, very heavy, and difficult to dispose of properly.
In short:
For modern landscape projects, purpose-made landscape timbers are typically the better choice.
Good timber work starts before the first timber hits the trench. The hidden parts – layout, base prep, drainage, fastening, and backfill – are what determine whether the wall lasts.
Start with these fundamentals:
For a retaining wall, a typical approach is to excavate a trench wide enough for the timber plus working room, then install a compacted crushed stone base. Several how-to sources recommend 6 to 8 inches of compacted gravel footing, with trench widths around 16 inches for common timber wall builds.
The first course should be buried below grade. Depending on design, one buried course or a substantial partial embedment improves stability. The base must be level side-to-side and front-to-back. If the first course is off, the whole wall will advertise it forever.

For broader guidance, see our retaining wall installation guide.
Several fastening methods can work, and the best choice depends on wall height and project type.
Common options include:
Rebar is often used to pin the first course to the ground. Research-based recommendations commonly call for 3- to 4-foot rebar spaced about 2 feet apart for retaining wall builds.
Timber screws are often easier to control and less likely to loosen than basic spikes in stacked courses. Galvanized spikes remain common for edging and lighter-duty assemblies.
A few best practices:
Adhesives can help in some non-structural applications, but they are not a substitute for mechanical fastening in a load-bearing wall.
A typical retaining wall build sequence looks like this:
That slight setback, called batter, helps the wall resist soil pressure. Also, avoid using lots of short offcuts in the wall face. Full-length timbers create stronger overlaps and fewer weak points.
For a detailed walkthrough, see how to build a retaining wall with landscape timbers.
Edging and raised beds are simpler, but the same principles still apply: stable base, proper anchoring, and moisture management.
For edging and beds:
For steps:
Curves are possible, but long straight segments and gentle radii work best with standard timber sizes.
If timber walls had a sworn enemy, it would be trapped water.
Drainage is what keeps timber from sitting in constant moisture and what keeps hydrostatic pressure from pushing the wall outward.
A good drainage setup usually includes:
Non-woven fabric is important because it filters fines without choking off flow. Some sources warn against woven fabric in this application because it can restrict drainage and contribute to pressure buildup.
For some walls, weep holes may also be used at intervals, often every 4 to 6 feet, but the main point is simple: water needs a reliable path out.

A solid outside reference is this step-by-step timber wall guide.
Once walls get taller, reinforcement becomes much more important. A common rule of thumb is that deadmen or tie-backs should be considered for walls over about 2 to 3 feet, depending on site conditions and local requirements.
Typical guidance includes:
These members extend back into the retained soil and help anchor the wall against forward movement. If the wall is near a driveway, structure, fence, or slope surcharge, professional design becomes even more important.
Most failed timber walls do not fail because “wood is bad.” They fail because the details were skipped.
The most common mistakes are:
A well-built wall can last 15 to 25 years. A badly built one may start leaning far sooner. If you are troubleshooting an existing problem, our retaining wall repair guide 2025 is a helpful next step.
Before building, check local requirements in your town. In many communities, permits may be triggered around 30 inches of wall height, and walls around 4 feet often move into engineering territory. Those are common thresholds, but local enforcement and site conditions matter.
Also check for:
And please do not underestimate the basic safety side of this work. Timbers are heavy, rebar is unforgiving, and compactors do not care if your weekend plans included back pain.
Use:
For additional reading, see how to build a timber retaining wall that lasts.
Based on internet pricing averages, a basic timber retaining wall commonly lands in a wide range from $800 to $3,600 or more (note: these are average costs based on internet data and not actual costs for McLeod Landscaping). Small timber projects may start around $300 and rise to $4,500 or more depending on size, demolition, access, drainage work, steps, and finish details. More involved or professionally installed jobs can run well beyond that.
Concrete block usually costs more than timber, and natural stone usually costs more than both. Research consistently suggests timber can be about half the cost of concrete block for comparable low walls.
Timeline-wise:
These are average internet-based estimates, not McLeod Landscaping pricing.
A well-constructed timber wall typically lasts 15 to 25 years. That range depends on:
The same timber in a dry, well-drained installation will outlast one buried in soggy clay with no outlet for water.
Timber walls are not maintenance-free, but they are manageable if you stay ahead of problems.
We recommend:
For more on long-term upkeep, visit our landscape timber retaining wall page.
When buying timbers, look for:
Ask what species and treatment you are actually getting. Delivery logistics matter too. Timbers are heavy, and ordering the wrong product is an expensive way to get a surprise workout.
As a general rule, keep DIY timber retaining walls under 3 to 4 feet unless a qualified professional has reviewed the design. In many towns, walls around or above 4 feet require engineering, and permits may be triggered lower than that. If the wall supports extra loads from parking, structures, or steep slopes, get professional guidance sooner rather than later.
The best base is a level, compacted crushed stone footing with good drainage. Many builds use 6 to 8 inches of compacted gravel under the wall, with the first course buried below grade. For edging, the base can be shallower, but the principle stays the same: stable, level, and drainable.
Yes, but with an important distinction. Landscape timbers can be used for planters, edging, steps, small garden structures, and rustic outdoor projects. They have even been used in cabin-style builds, as shown in this homestead cabin built with landscape timbers. But structural building work is a different category from landscape retaining walls, and it must follow applicable building codes, material safety rules, and engineering requirements.
Landscape timber construction is a practical, attractive option for low retaining walls, raised beds, edging, steps, and similar landscape features across the Merrimack Valley. When the material is chosen carefully and the wall is built on a solid base with proper drainage, fastening, and reinforcement, timber can deliver excellent value and a service life of 15 to 25 years.
At McLeod Landscaping, we help property owners throughout Tewksbury, Andover, Billerica, Burlington, Carlisle, Chelmsford, Concord, Lowell, Westford, and Wilmington decide when timber is the right fit – and when another retaining wall material makes more sense. If you are planning a new wall or replacing one that has started to lean, rot, or bulge, explore our retaining wall installation services to take the next step.
Contact McLeod Landscaping today at (978) 640-0957 or click here to schedule a consultation for retaining wall installation. Let our experienced team design and install a functional and visually appealing retaining wall that enhances your landscape.

1881 Main St Unit 1, Tewksbury, MA 01876