
Building a walkway with pavers is a straightforward DIY project that can boost your home’s curb appeal, add function to your yard, and even increase property value — often completable in a single weekend.
Here’s a quick overview of how to build a paver walkway:
A paver walkway does more than just look good. It protects your lawn from wear, defines your landscaping, and gives visitors a clear, safe path to your door. Whether you’re connecting a driveway to a front entrance or winding a path through a garden, the results can be dramatic.
The project does involve real physical work — digging, hauling gravel, and tamping — but with the right tools and a clear plan, most homeowners can pull it off successfully.
I’m Scott McLeod, owner of McLeod Landscaping Inc., and with over 30 years of hardscaping experience in the Merrimack Valley, I’ve designed and built countless paver walkways for both residential and commercial clients. In this guide, I’ll walk you through everything you need to know about building a walkway with pavers the right way, from first stake to final sweep.
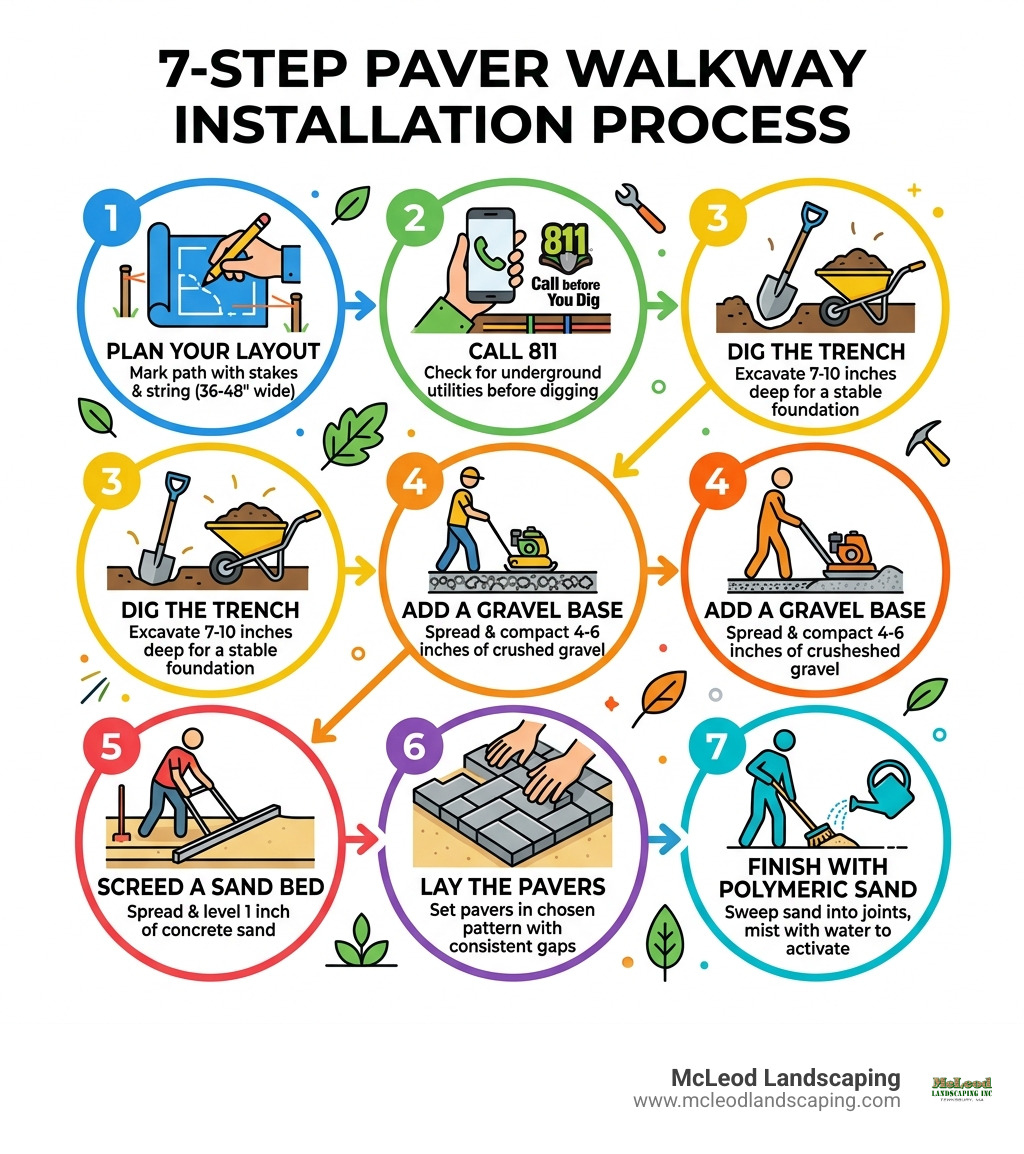
Simple building a walkway with pavers word guide:
Before you pick up a shovel, we need to talk about the most critical phase: the plan. Precision here saves you from a literal backache later. When we design Paver Landscaping for homes in Andover or Chelmsford, we always start by visualizing how the path will be used.

How wide should your walkway be? For a standard path, 36 inches is the minimum. However, if you want two people to walk comfortably side-by-side, we recommend a width of 48 inches. If you are designing for wheelchair accessibility, you must maintain at least a 36-inch width and include a 60-inch turnaround area.
In the Merrimack Valley, from Billerica to Westford, you must call 811 before you dig. This free service ensures you don’t accidentally hit an underground gas or water line. Additionally, check with your local building department or HOA. While a small path rarely requires a permit, larger projects or those affecting drainage might. You can learn more about these initial steps in this guide on How to Design and Build a Paver Walkway.
Water is the enemy of a stable walkway. You must ensure your path slopes away from your home’s foundation at a rate of 1/8-inch per foot. This prevents puddling and protects your basement from moisture. We use stakes and string lines to maintain this consistent “pitch” throughout the excavation.
To get professional results, you need the right gear. Building a walkway with pavers is much easier when you aren’t fighting your equipment.
Your Essential Tool Checklist:

For more ideas on how to set up your workspace, check out our guide on Backyard Paver Walkway projects.
The materials you choose define the look and longevity of your path.
Beyond the stones themselves, you’ll need a “sub-base” of crushed gravel (often called ¾-minus) and a “bedding layer” of concrete sand. To keep everything from shifting, you’ll also need edge restraints and polymeric sand. This Old House provides a great deep dive into How to Build a Concrete Paver Walkway.
Safety isn’t just a suggestion; it’s a requirement. When building a walkway with pavers, you are dealing with heavy materials and power saws.
For more safety tips, see our article on Laying Down The Law On Diy Stone Paths.
Now, let’s get into the dirt. Building a walkway with pavers is all about the foundation. If the base is bad, the walkway will fail.
Dig your trench to a depth of 7 to 10 inches. This allows for 4–6 inches of gravel, 1 inch of sand, and the thickness of the paver itself. Remove all sod, large rocks, and loose soil.
Add your crushed gravel in 2-inch “lifts.” After each layer, wet it slightly and run the plate compactor over it. You want a rock-solid foundation that won’t settle.
Lay your 1-inch pipes on the compacted gravel. Pour concrete sand between them and use a straight 2×4 board to “screed” the sand flat. Once finished, remove the pipes and fill the indentations with a little extra sand.
| Feature | Traditional Gravel Base | Paver Base Panels |
|---|---|---|
| Excavation Depth | 7–10 inches | 4–6 inches |
| Physical Effort | High (lots of digging/hauling) | Moderate |
| Stability | Excellent (if compacted well) | Good for light foot traffic |
| Drainage | Natural drainage | Varies by panel design |
When you start laying pavers, work from one corner and move outward. Use “nubs” (spacers built into many pavers) to keep joints consistent.
If your path curves through a garden in Carlisle or Wilmington, you’ll need to cut pavers. Use a wet saw for the cleanest results. To manage curves without constant cutting, you can use “half blocks” or stagger the joints to create a gradual bend.
We’ve seen it all in our 30 years. Avoid these pitfalls:
The “finish” is what turns a pile of stones into a professional-grade walkway.
Once your pavers are laid, install plastic edge restraints along the perimeter and secure them with 10-inch landscape spikes. This prevents “creeping” over time. Next, sweep polymeric sand into every joint. This specialized sand contains binders that turn into a glue-like substance when wet. Mist the walkway with water (don’t soak it!) and let it cure for 24 to 48 hours before walking on it. For more on these final touches, view our Walkway Installation Services page.
When planning your budget, it is helpful to look at market trends. Based on internet data averages, a DIY paver walkway typically costs between $8 and $30 per square foot for materials. If you choose to hire a professional for Walkway Installation Services, national average costs can range from $25 to $175 per square foot, depending on the complexity, material choice, and site conditions (such as steep slopes or poor soil).
Please note that these figures are based on general internet data and industry averages and are not the actual costs for services provided by McLeod Landscaping. Every project we undertake is unique, and final pricing depends on a specific site evaluation and custom design requirements.
Factors Affecting Price:
A typical DIY project takes 2 to 3 full days of work.
A well-built walkway can last 20 to 25 years. To keep it looking new:
For a standard residential walkway in the Merrimack Valley, you should dig between 7 and 10 inches deep. This accounts for a 4-to-6-inch gravel base, a 1-inch sand bed, and the paver itself.
Polymeric sand is the gold standard. It resists weeds, prevents ants from nesting in the joints, and won’t wash away during a heavy New England rainstorm.
The best defense is a solid foundation. Using a landscape fabric under your gravel base and filling your joints with polymeric sand creates a barrier that makes it very difficult for weeds to take root.
Building a walkway with pavers is a rewarding way to transform your outdoor space. There is a special kind of pride that comes from walking across a path you built with your own hands. However, we also know that not everyone has the time or the desire for “back-breaking” weekend labor.
If you’re in Andover, Burlington, or anywhere in the Merrimack Valley and want professional, long-lasting results without the DIY stress, we are here to help. At McLeod Landscaping, we bring 30 years of experience to every stone we lay.
Ready to upgrade your home? Explore our Walkway Installation Services or contact us today to start your landscape transformation!
Contact McLeod Landscaping today at (978) 640-0957 or click here to schedule a consultation for retaining wall installation. Let our experienced team design and install a functional and visually appealing retaining wall that enhances your landscape.


1881 Main St Unit 1, Tewksbury, MA 01876